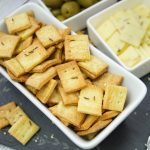
These crunchy Homemade Saltine Crackers are easy to make and ready in no time. The perfect crispy cracker for serving with cheese, dips, or snacking on their own.

Homemade Saltine Crackers
If you love crispy, light crackers with that classic salty crunch, these homemade saltine crackers are going to surprise you. They are simple to make, incredibly satisfying, and taste even better than store-bought.
This is one of those recipes that feels a little extra at first, but once you make it, you realize how easy it actually is. And suddenly, buying crackers at the store feels completely optional.
They are perfect for casual entertaining, snack boards, or just having something crunchy around the house that you made yourself.

Why You’ll Love These Homemade Saltine Crackers
- They are crispy, light, and perfectly salty
- Made with simple pantry ingredients
- Easy to customize with different toppings
- Perfect for cheese boards and dips
- A fun baking project with impressive results
What Makes Them Special?
These crackers have that signature crunch you expect from saltine crackers, but with a fresh, homemade flavor that is hard to beat. You can also control the thickness, size, and toppings, which makes them incredibly versatile.
Top them with sesame seeds, caraway seeds, herbs, or a sprinkle of flaky salt for extra flavor.

How To Shape Them
Once the dough is rolled out thin, you can cut the crackers into small squares for a classic saltine look. You can also cut them larger or use cookie cutters if you want a more decorative style.
The thinner you roll the dough, the crispier the crackers will be.

Perfect For Entertaining
These homemade saltine crackers are perfect for serving with cheese, spreads, hummus, or dips. They are a great addition to snack boards and make even a simple gathering feel a little more special.
Because they are so light and crispy, they pair well with both savory and slightly sweet toppings.

Why Make Crackers From Scratch?
Once you see how easy it is to make your own crackers, it becomes one of those recipes you come back to again and again. The texture, flavor, and freshness are just better.
Plus, it is always fun to serve something homemade that people do not expect you to make from scratch.

Frequently Asked Questions
Are homemade saltine crackers crispy?
Yes, when rolled thin and baked properly, they come out crispy and light with a classic crunch.
Can I customize the toppings?
Absolutely. You can add seeds, herbs, or flaky salt to create different flavors.
How thin should I roll the dough?
Roll the dough very thin for the best crispy texture. Thicker dough will result in softer crackers.
How should I store homemade crackers?
Store them in an airtight container at room temperature to keep them crisp.
I hope you give these delicious Homemade Saltine Crackers a try. If you make them, tag me on Instagram @LivingSweetMoments.

Homemade Saltine Crackers
Ingredients
For Saltine Crackers
- 2 cups All Purpose Flour
- 2 teaspoons Salt
- 1 teaspoon Baking Powder
- 1/2 cup Water
- 1/4 cup Olive Oil
Toppings
- 2 Tablespoons Olive Oil
- 1 Tablespoon Coarse Salt
- 1-2 Tablespoon seeds, herbs, nuts, etc
Instructions
- Preheat oven to 400 degrees Fahrenheit
- Line 2 cookie sheets with parchment paper
- In a bowl, combine the flour, salt, and baking powder
- Add the olive oil and mix with a wooden spoon. Slowly add the water and mix with your hands
- Dump the mixture onto the counter and knead with your hands until a ball of dough is formed
- Place the ball back in the bowl, cover with plastic or foil and let the dough rest for 10-20 minutes
- Divide the dough in half. Work with one piece at a time. Mold each half into a ball
- Using a rolling pin, spread the dough ball into a thin rectangle
- Place the rectangle on the lined cookie sheet. Cut into small squares using a pizza cutter or knife
- Make 3-4 small holes into each cracker using a fork or skewer
- Brush the tops with olive oil and sprinkle your desired toppings
- Bake for 12-15 minutes or until the crackers are golden and crunchy
- Remove from oven, place on a cooling rack
- Enjoy!


Tiffany how cute these crackers! I want to make them asap!
Thank you!
Que belleza, me encanta hacer galletas! Voy a prepararlas y te cuento!!!
Gracias Pilar! Me dejas saber que te parecieron!
I need butter and homemade crackers in my life now!!!!
And some jam would be nice as well 😉
What a fabulous idea!! They look so cute and delicious. Printing the recipe!!
Let me know how they come out!
I made them, I loved them, and will never buy saltines again. I actually doubled the recipe the first time I made it and served it with my own chili concarne. The “left over” crackers were devoured by my kids. Thank you for this delicious recipe, I will definitely enjoy a glass of wine the next time I made these yummy saltines.
Hi Melinda! thanks for your feedback! glad you and your family enjoyed them! Next time you can add some parmesan cheese, chives or spices to your crackers so they can be adapted to whatever you’re serving them with. Have a great weekend
Hi can i use baking soda instead of baking powder
Hi Kanch, no, baking soda needs an acid to activate
Hi! Thank you for these! How long do you think you can store them for?
About 5 days in an airtight container
Could I use whole wheat or halfvwhole wheat for this recipe? Also, just how thin should I roll the dough? Should the rectangle fill up two standard size cookie sheets?
Yes you may, just increase the liquid ingredients by 25%. Roll the dough about 1/4 or 1/8″ inch to get them crispier
Do I need to flip the crackers over midway?
Never mind. I found I did need to flip them for a consistent color
Hi Rich. Depends on the type of oven. For convection ovens, there’s no need to flip, for regular ones yes.
These were delicious! I made them for my son who was having tummy troubles since we didn’t have any crackers on hand. The whole family loves them. It was a fun learning experience. The second batch turned out better. I think because the dough had extra rest time it was rolled out slightly thinner. I will experiment with flavors next time. Thanks for the recipe!!
you’re very welcome!!