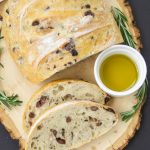
This rosemary olive bread is crusty on the outside, soft and chewy on the inside, and honestly… better than most bakery loaves. No kneading, no stress, just really good bread.

Crusty Rosemary Olive Bread
There are two types of people in this world. People who like bread… and people who LOVE bread.
If you’re here, I already know which one you are.
This rosemary olive bread is everything you want in a loaf: crispy crust, chewy center, and little salty bursts from the olives that make you keep going back for “just one more slice.”

—
Why This Bread Works
This is a no-knead bread, which means:
- No stand mixer
- No arm workout
- No stress
Just time doing its thing while you live your life.
The long fermentation gives you that deep, bakery-style flavor without complicated steps.
—
The Flavor Situation (Important)
The rosemary gives this bread that warm, herby aroma, while the olives bring salty, briny goodness in every bite.
Use Kalamata olives for bold flavor, or green olives if you prefer something milder.
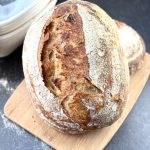
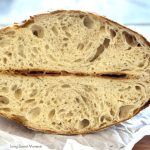
This no knead rosemary olive bread is crusty on the outside, soft and chewy on the inside, and honestly better than most bakery loaves. No mixer, no kneading, just time doing all the work.
No Knead Rosemary Olive Bread
There are two types of people in this world. People who like bread… and people who LOVE bread.
If you’re here, I already know which one you are.
This no-knead rosemary olive bread is everything you want in a loaf: crispy crust, chewy center, and little salty bursts from the olives that make you go back for “just one more slice.”
If you’ve never made a no-knead bread before, this is the perfect recipe to start.
—
Why This No-Knead Bread Works
This is a true no-knead bread, which means:
- No stand mixer
- No kneading
- No complicated steps
Instead, time does all the work. The long fermentation develops flavor and creates that chewy artisan texture without extra effort.
—
The Flavor Situation (Important)
The rosemary gives this bread a warm, herby aroma, while the olives bring a salty, briny flavor in every bite.
Use Kalamata olives for bold flavor, or green olives if you want something milder.
Either way, this bread disappears fast.

—
The Secret to That Crusty Exterior
Say it with me: Dutch. Oven.
Baking this bread in a Dutch oven traps steam, which creates that crispy, golden crust you usually only get from a bakery.
Once you try it, there’s no going back.
—
Do You Really Need to Wait That Long?
Yes. I know. Waiting is not fun.
But the long rise is what gives this no-knead rosemary olive bread its texture and flavor.
Think of it as low-effort, high-reward baking.

—
How to Serve It
This bread is perfect with:
- Olive oil and balsamic vinegar
- Soft butter (mandatory)
- Cheese boards
- Soups and stews
Or just tear off a piece straight from the loaf while standing in the kitchen. Highly recommended.

—
Frequently Asked Questions
Can I use different olives?
Yes. Kalamata, green, or a mix all work great.
Do I need a Dutch oven?
It’s highly recommended for the crust, but you can bake it on a sheet pan with steam.
Why is my bread dense?
Usually, it means the dough didn’t rise long enough or too much flour was added.
Can I freeze this bread?
Yes. Slice it first, then freeze and reheat as needed.
—
I hope you try this no-knead rosemary olive bread at home. If you do, tag me @LivingSweetMoments so I can see your beautiful loaves 💕
No Knead Rosemary Olive Bread
Ingredients
- 3 cups Bread Flour
- 1 2/3 cups Water room temperature
- 1/2 teaspoon Instant Yeast (for slow overnight rise)
- 1 1/2 teaspoons Salt
- 1/2 cup Kalamata Olives chopped
- 1 tablespoon Fresh Rosemary chopped
Instructions
- In a bowl, mix the flour, salt, yeast, and water until a sticky dough forms
- Add the rosemary and olives. Mix it in the dough. Dough will look wet and shaggy, this is normal. Do not add more flour.
- Wrap plastic wrap on top of the bowl and let it proof for about 12 to 18 hours at room temperature
- Preheat oven to 450 degrees Fahrenheit
- Place a dutch oven with lid inside the oven to preheat for 30 minutes
- Meanwhile, on a floured surface, drop the dough and shape into a ball or your desired shape
- Make 3 shallow slits at the top the bread
- Cover the bread with a clean kitchen towel while the dutch oven preheats
- Carefully, place the dough inside the preheated dutch oven. Cover with lid
- Bake for 30 minutes
- Remove the lid and bake for 10-15 minutes more or until browned on top and crusty
- When ready, place the bread on a cooling rack
- Enjoy!
Notes
- Dough texture matters: This dough will be very sticky and shaggy, that’s exactly how it should be. Do not add extra flour or the bread will turn dense instead of airy.
- Use instant yeast: This recipe is designed for instant yeast. If using active dry yeast, dissolve it in the water first and let it sit for 5–10 minutes before mixing.
- Long rise = better flavor: The 12–18 hour rise develops that deep, bakery-style flavor. If your kitchen is warm, check the dough closer to the 12-hour mark.
- Olives tip: Pat the olives dry before adding them to prevent excess moisture in the dough.
- No Dutch oven? You can bake this in a covered oven-safe pot or even on a baking sheet with a pan of hot water in the oven to create steam.
- Crust control: For an extra crispy crust, leave the lid off for the last 10–15 minutes of baking.
- How to know it’s done: The bread should be golden brown and sound hollow when tapped on the bottom.
- Cooling is key: Let the bread cool completely before slicing; cutting too early can make the inside gummy.
- Storage: Store at room temperature in a paper bag or wrapped in a towel for up to 2 days. Avoid plastic, it softens the crust.
- Freezing: Slice and freeze for up to 2 months. Toast straight from frozen.
Nutrition
—
You May Also Like
No Knead Crusty Bread

No Knead Pesto Bread

Cinnamon Raisin Artisan Bread

—


Lovely, i am impressed! Mine just came out the oven, smelled like heaven in the kitchen 😉 will tag you on Instagram. Thanks for a great recipe!
Awesome Maryam!! Let me know what you think.
Hi would I be able to use my steam bake setting and a pizza stone to make this recipe?
Hi Laz. I am sure that would work out, what I can’t say is the difference in baking times.
Good morning Tiffany ~ I’m sure I did something wrong with the Rosemary Olive Bread. My dough was extremely sticky and I had to add nearly a half cup of flour to just be able to handle. It’s still very sticky, but I’m going to drop it in the Dutch oven and see what happens. FYI, I used kalamata olives. Any ideas? Thanks!
Hi Debra! The dough is sticky, that’s why it needs a lot of time proofing and no kneading. Let me know how it comes out of the oven.
I had a little trouble getting it out of the pan, but the taste is very good. I’ll definitely make again, now that I know what to expect. Thank you for sharing this recipe!
You’re very welcome Debra! Thanks for your feedback! Glad you enjoyed the flavor.
Hi Tiffany. What size dutch oven do u recomend using? Thanks
Hi Eve, a 6 qt should work just fine
Other recipes recommend a dough sling made with parchment paper. It’s a crisscross thing, look it up. You can transfer the sticky dough into the bowl lined with the sling and lower it into the hot dutch oven. No finger burning or handling the sticky dough! I only use that method and am making one right now! 🙂
that’s a great tip Carol! thanks for sharing!
Me again. Making a loaf today and excited to have the smell in my house! I’m going to try a bit in my cast iron skillet in roll form. The lid to my large dutch oven fits this skillet. I’ll let you know what happens!
Please let me know how it comes out!
Thank goodness I am not the only one, it was just a runny mess after 18 hours proofing. Waiting for pan to heat up and will still try to bake it but have little hope?
Hi Linda, did you use instant yeast or active dry?
You said it would work with active dry yeast. Will it or not? And how do you adjust the amount of yeast?
Yes, you may need to activate it first. To do so, warm up the water required in the recipe until it’s lukewarm (not hot nor cold) and add the yeast. Cover with a dishtowel for 10 minutes.
Proceed with the recipe.
The dough is supposed to be very sticky. I have mine in the oven as we speak. The recipe is the normal set up for artisan bread. I’m excited to see how it turns out! I already know it’s going to taste amazing. Presentation wise it might not be there, the dough slipped out of my hands into my Dutch oven, I’m expecting it to be lop sided. I think next time I will mix the olives into the flour prior to adding water. I noticed mixing all the olives stuck to one side and not evenly mixed into the dough
I hope you liked the taste and texture Nikki
Where do I put it to proof? Should I leave it on the counter or stick it in the fridge?
You can leave it on the counter, inside a cupboard, or anywhere else at room temperature. Do not place it in the fridge since it will prevent the yeast from growing
How about using the proofing option on my oven? Will it still need as long to rise?
Yes, proof it in your oven for 4 hours. If it rises then bake.
you will only stop yeast from working by freezing refridge. only slows it down
Hello. Can i do it without the dutch oven ? Can in do ot in a normal baking sheet?? Thank you for your response! Regards from Nicaragua !
Hi Maria! You can, but it won’t be as crusty as this recipe. Saludos!
Hi. I’d lije yo try baking this but how do u bake it in the dutch oven?
Hi Tini. It’s easy! Simply preheat your dutch oven with lid (as the recipe indicates), then carefully remove from the oven with gloves, open the lid and toss your bread dough inside, close the lid and bake in the oven.
If this seems daunting, bake in a sheet pan instead of the dutch oven
Tried you recipe today! Delicious! I’m an amateur bakers and was wondering what conversions you would make for altitude (I live in colorado). The bread came out a bit dense/rawish inside (not enought not to eat lol) and I betting its because I did absolutely nothing for altitude 🙂
Thanks!
Glad you liked the Recipe Misha! thanks for your feedback!
I’m not a huge bread maker,just recently got into it, this bread I definitely will make again,way better then the bought one,love the taste,I used the Kalamata olives,and also added chives,was so good,will always use the Dutch oven came out perfect,Thank you for the awesome recipe.
Thanks for the feedback Susan! Chives sound like a great combination with the olives. I will try it next time
Tiffany was wondering if this recipe can be proofed in the Instant Pot.
Yes it can Mary!
How long would you proof it in the IP. The sourdough was 4 hours.
Same Mary! 4 hours and it’ll be done
Thanks so much. Appreciate your quick response. I thought since it does not have yogurt it might be different.
🙂 You’re very welcome! let me know how it comes out
Tiffany, I love you so much. I made this for my guys board game night and it was such a hit
glad they liked it! thanks for your feedback
This is like the bread I used to buy in San Francisco. Could I add the olives and rosemary to the bread recipe made with yogurt and proceed with that recipe?
of course Rochelle! make it your own
Hello Tiffany, I spent some time searching for a good rosemary bread and then found yours. Just what I was looking for! Bonus! It has olived as well!
Would you say this is kind of a ciabatta bread?
Looking forward to baking this recipe! I will post my comments soon 🙂
Thank you!!
Hi Jess!
The bread is not like a ciabatta because of the texture. Ciabatta is flatter and has big giant holes in the crumb. Still, both are delicious :p That gives me an idea to make a future recipe 😉
Hi! I’m planning on making this bread but will be using a wood fired oven. Do you think the temp and baking time will be the same as a Dutch oven? Thanks!
Hi Christina, honestly, I’ve never baked in one so just check it 10 minutes before just in case
My dough was like pancake batter that I literally poured onto my counter! After adding about another cup of flourI was able to shape it into a round loaf. I measured carefully. There is no way that the flour to water ratio is correct. However, the bread turned out great.
I used the parchment sling method for placing the bread in the hot pan.
Oh no! I am so sorry that happened! I have been doing this recipe for a long time and it always worked. I know some brands of flours absorb water at different ratios so that may have been a factor or it wasn’t measured properly
The preparation time does not take into account the amount of time required to proof.
The dough is very sticky and difficult to handle, and the bread is quite chewy.
If your bread is chewy is because it may have been underbaked Ashley. I am sorry the recipe didn’t work out for you.
The bread stuck to the bittom of the dutch oven – had a difficukt time remiving it for cooling. Hiwever yet to taste it. Tganks for yoyr thoughts.
You’re welcome! was your dutch oven scratched on the bottom?
looks yummy!
My first time baked bread EVER and it turned out incredible! I’m so proud and wish I could post pictures of my masterpiece.
You can post them on Instagram! I would love to see it!
I was very skeptical of this recipe, it just seem too simple. Was I ever fooled, it was amazing! I think it’s the best bread I’ve ever made! Thank you so much for putting this recipe up there.
You’re welcome Suzanne! Glad you liked it! It’s a favorite around here!
Hi Tiffany! I am dying to make this recipe but I don’t have bread flour and all I have is activated dry yeast. Is it possible to use these, if so what modifications would you suggest?
Yes! It will work!
I’m finding that when I remove the lid after 30 minutes the bread is very brown. The additional time uncovered makes it almost burnt. What am I doing wrong? Should I reduce the temperature?
Hi Debbie! Your oven is much better than mine! Uncover at 15 minutes and check the top 15-20 min later
My bread turned out fantastic! I added a little garlic powder to the mix too. I made the dough before bed and baked it when I woke up. Side note: The inactive time should be added to the prep time.
Glad you liked it! and thanks for tip, I’ll add it to the recipe
Can I use dry rosemary in place of fresh? Is the measurement the same?
Use half the quantity for dried rosemary (it’s stronger than fresh)
Terrible. Way too wet dough, Bread stuck to the bottom of the pan. Couldn’t form into a ball, needs more flour or less water.
You could’ve added more flour. Different brands of flour don’t absorb liquid equally. Since the quarantine started we have switched to whatever flour brands we could find and the difference in liquid absorption is abysmal, especially when it comes to store-branded flours. Many needed to add 30% more flour than the recipe required.
Hi,
I live in the Caribbean where it’s about 30C outside.
How long do I leave this olive bread to proof?
I’m excited to try this.
Thank you
Try 4-6 hours and see if grows
Thank you
I used the metric measures, as I have a digital scale for the ingredients. But, as you can see, the US measurements call for more flour than water, but the metric measurements call for more water than flour. I just followed the metric measurements and ended up with a sticky mess after 17 hours of proofing. Thanks a lot. You need to check these things if you’re going to post it. Now I have to throw it all out and will have nothing to. accompany my dinner party.
oh I am so sorry Terry. Unfortunately, the metric measurements are calculated by the recipe card software. I will double-check them since I thought they were reliable. My apologies again and I hope your dinner party was a success.
You should add the details about proofing at room temperature to the recipe instructions. The bread is in the dutch oven cooking now, but didn’t read far enough down in the comments last night to see the note about not proofing in the fridge. 🙁 Hoping it still turns out okay!
I will update it right now Kerri. Sorry about that. Let me know how it comes out! I promise you will love it!
It still came out amazing – phew!!! Making it again this week! 🙂
I bake this bread often and it is always a hit!
I want to split the dough in half and make two loaves. Do you have any idea how the baking time will differ?
Thanks!
Hi Rachel. Yes, bake for 20 minutes lidded and then take the lid off and bake for 10 more minutes or until golden and crusty
Love…Love…this bread!!
Thank you for sharing it!
I would like to try it with cinnamon and raisins?
Thanks for your feedback!
Made this recipe this weekend, it was so good! I added half the olives and used garlic cloves for the other half! Amazing! I had one question, which size dutch oven did you use? I just used a sheet pan but now I want a dutch oven!
That’s great Jessica! I used a 5.5 qt size
My dough was rising through the night then fell. Is this normal?
Yes!
The recipe was so easy . The bread is delicious and did not disappoint. The only thing I did different was to place the dough on parchment paper before placing in the Dutch oven.
Thanks for your feedback lynn! glad you liked the recipe
Opposite, I kneaded my dough out of habit…. hopefully it turns out fine????
yes! it will
Can “bread machine “ instant yeast be used in this recipe?
Yes!
Can you divide this dough and make rolls ? I have made this bread many, many times and is outstanding but I was thinking rolls would be nice. If so how long would you suggest baking the rolls and measurement wise ounces of dough per roll?
Yes! of course you can! Each roll uncooked should be about 2 oz – You should get 10-12 rolls in this recipe – they bake for 18-20 minutes or until golden brown
I’ve made this bread twice. Following the instructions to the tee. Unfortunately, the bread does not rise in the oven and has a strong yeast smell. My boyfriend LOVES the way it tastes and the texture even though it didn’t rise in the oven. I let it proof for 18 hours and it doubled in size. Very sticky too. I’m not in a warm area. Should I let it proof less?? What am I doing wrong that it does not rise in the oven?
MMM Pam… That is so strange. Did you check the expiration date on the yeast packet? Also, did you use instant yeast and not active dry?
Where did you proof it?
Yes. I checked the expiration date on the yeast. It is good. I used instant yeast. I proofed it in a warm area. I’ve made it 3 times now and it turned out the same each time. The dough does not retain it’s shape after 18 hours of proofing and shaping (or trying to shape). Maybe I let it proof too long?? Maybe just 12 hours would be good? The “1/2 teaspoon of yeast “is not a misprint, right? That seems like such a small amount of yeast.
However, I have to say…. even though it did not rise in the oven, my boyfriend loves this bread just how it is. Texture and taste. It is now one of his favorites. LOL!
I am just curious if it would be even better if it did rise correctly.
Thank you for responding and your recipes!
Hi Pam! yes 1/2 teaspoon is the correct measurement, it’s a small amount because the proofing is longer than regular bread. It gives it more taste. What I am thinking is that various brands of flour absorb liquid differently. In your case, I would increase the amount of flour in the recipe, maybe by 1/4 cup. I think that should help it retain its shape. In this recipe (which is very similar) scroll to see the pictures of the process: https://livingsweetmoments.com/no-knead-crusty-bread-4-ingredients/
Used the metric conversion provided for the recipe. The calculation is wrong. I should have double checked. Big effort into the bin.