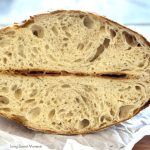
This No Knead Pesto Bread is crusty on the outside, soft and airy on the inside, and packed with garlicky basil pesto flavor. It is an easy Dutch oven bread recipe with no kneading required.

No Knead Pesto Bread
There is something magical about pulling a golden loaf of bread out of the oven, especially when every bite is filled with the bold flavor of basil pesto, garlic, olive oil, and herbs. This no-knead pesto bread looks bakery-worthy, tastes incredible, and takes hardly any hands-on work.
The crust is beautifully crisp, the crumb stays soft and chewy, and the pesto adds rich, savory flavor throughout the loaf. It is the kind of bread that makes your kitchen smell amazing and disappears almost as soon as it hits the cutting board.
Best of all, there is no mixer and no kneading involved. Just stir the dough together, let time do the heavy lifting, and bake it in a hot Dutch oven for that signature artisan-style crust. Easy, cozy, and dangerously delicious.
Why you will love this recipe
No kneading, big flavor, gorgeous crust, and a soft, airy center. This is one of those easy bread recipes that feels extra special with very little effort.
Why You Will Love This No-Knead Pesto Bread
- No kneading required, perfect for beginner bread bakers.
- Dutch oven baking creates a crisp, crackly crust.
- Pesto adds tons of flavor without extra complicated steps.
- Versatile and delicious, serve it with butter, soup, pasta, salad, or sandwiches.
If you loved my No Knead Crusty Bread, this flavorful variation is a must-make. It has the same easy method, but with a savory pesto twist that makes it feel fancy enough for guests and easy enough for a regular weeknight.

What Makes This Bread So Good
This recipe works because the long resting time allows the dough to develop structure on its own, no kneading needed. The covered Dutch oven traps steam, which helps the loaf rise beautifully while creating that crisp artisan-style crust everyone loves.
The pesto gets folded right into the dough, so instead of simply spreading it on top after baking, the flavor becomes part of the bread itself. You get little pockets of basil, garlic, and olive oil in every slice, which makes this loaf extra irresistible.
It is delicious warm with butter, dipped into olive oil, or turned into the best sandwich ever. Add turkey, fresh mozzarella, tomato, or grilled chicken, and you are in business.
Flavor tip
Use a thick pesto for the best results. If your pesto is very oily, the dough can get too loose, and the swirl will not be as defined.
The first time I made this bread, it disappeared almost immediately. Freshly baked bread is already hard to resist, but the pesto takes it to another level. My husband took one bite and declared it one of the best loaves I had ever made. Honestly, I could not argue with him.

Tips for the Best Pesto Bread
- Use good pesto. Homemade or store-bought both work, but choose one with great flavor.
- Do not overmix. You want the pesto distributed through the dough without completely deflating it.
- Preheat the Dutch oven well. That blast of heat helps create oven spring and a crisp crust.
- Let the bread cool before slicing. It is tempting to cut in right away, but waiting helps the crumb set properly.
If you love baking cozy homemade loaves, be sure to check out my Crusty Rosemary Olive Bread Recipe too. It is another flavorful loaf that is perfect for soup nights, pasta dinners, or snacking straight from the board.
Serving Ideas
This no-knead pesto bread is delicious all on its own, but here are a few favorite ways to serve it:
- Warm with salted butter
- As a side for pasta, soup, or salad
- To make sandwiches with turkey, chicken, mozzarella, or tomato
- To dip in olive oil and balsamic vinegar
- To toast and top with eggs or avocado
It also makes a fantastic addition to a dinner party bread basket. Slice it up and watch it vanish.
How to Store and Reheat
Store the bread tightly wrapped at room temperature for up to 2 days. For longer storage, slice and freeze it in a zip-top bag. Reheat slices in the toaster or warm the loaf in the oven for a few minutes to bring back that amazing crust.
If you somehow have leftovers, this bread also makes excellent croutons and panini.
Frequently Asked Questions
Can I use store-bought pesto?
Yes. Store-bought pesto works beautifully here. Just try to use one that is thick and flavorful.
Do I need a Dutch oven?
A Dutch oven gives the best crust because it traps steam while the bread bakes. If you do not have one, you can still bake the bread on a hot baking stone or sheet pan, but the crust may be a little different.
Why is my dough so sticky?
No-knead dough is naturally wetter and stickier than traditional bread dough. That extra moisture helps create the airy crumb. Lightly flour your hands and work surface when shaping.
Can I add cheese?
Absolutely. A little grated Parmesan or shredded mozzarella would be delicious in this loaf.
Can I freeze this bread?
Yes. Let it cool completely, then freeze whole or sliced. Wrap well to keep it fresh.
I hope you give this delicious No Knead Pesto Bread a try. It is easy, flavorful, and one of those recipes that makes homemade bread feel totally doable. If you make it, I would love to see it. Tag me on Instagram @LivingSweetMoments and use the hashtag #LivingSweet so I can cheer you on.


No Knead Pesto Bread
Ingredients
- 3 cups bread flour
- 1 cup prepared pesto thick, not too oily
- 1 teaspoon instant yeast
- 1 teaspoon salt
- 1 cup water room temperature
Instructions
- In a large bowl, combine the flour, yeast, and salt.
- Add the pesto and water. Mix with a wooden spoon until a shaggy dough forms. Do not overmix.
- Cover the bowl with plastic wrap and let the dough rest at room temperature for 12 to 18 hours.
- Place a Dutch oven with its lid inside the oven and preheat to 450°F.
- Lightly flour a work surface. Turn the dough out and gently shape it into a ball.
- Carefully place the dough into the hot Dutch oven. Cover with the lid.
- Bake for 30 minutes with the lid on.
- Remove the lid and bake for an additional 12 to 15 minutes, or until golden brown.
- Let the bread cool before slicing.
Notes
- Use a thick pesto for best results. Oily pesto can make the dough too wet.
- The dough will be sticky, this is normal for no-knead bread.
- For extra flavor, add 2–3 tablespoons of grated Parmesan cheese to the dough.
- You can use all-purpose flour instead of bread flour, but the texture will be slightly softer.
- Store at room temperature for up to 2 days or freeze slices for longer storage.
Nutrition

You may also like:
Crusty Rosemary Olive Bread Recipe

No Knead Crusty Bread

Cinnamon Raisin Artisan Bread


I think this is a brilliant idea! I love the flavor of pesto and I would absolutely love to try this one day! I will be saving the recipe! Thank you! =D
My Latest Post: Hair Porosity 101
Thanks so much Rocio!!
I’m sure this smells heavenly as it’s baking! I love no-knead bread but I’ve never branched out beyond the classic. I can’t wait to try this!
It really does Bet! Let me know what you think!
Under the steps it lists a “cup of water at water temperature “. Do you mean room temperature? This looks delicious!
Correct Jen. Sorry for the typo
I made this the other day and everyone who tried it was *in love* with it! I used a 6-oz container of store-bought [vegan] pesto instead of a full cup, and I used one packet (~2.25 tsp) active dry yeast, not 1 tsp instant dry yeast, so my first step was to sprinkle the yeast on the water at 115 degrees F and let it sit for about 10 minutes. From there, I followed your steps exactly. The bread was really wonderful. Air pockets were tiny and the crust, especially right after I pulled it out of the oven, was especially crispy. It softened as the day progressed, though. Due to the quantity of pesto the bread was fairly fatty, but not in a bad way; it just definitely didn’t need butter. I do think that next time I’ll let the dough rise again after shaping it into a ball, because I thought I lost a lot of potential volume by throwing it right in the oven after shaping.
All in all though, truly a fantastic recipe – a keeper for sure.
Hi Tina! Glad you liked the recipe. Thanks for your tips and substitutions, it will surely help others.
Proof until doubled? The amount of hours seems extremely long.
Hi Gail, this bread technique creates a wonderful flavor and very crunchy crust. It has much less yeast than other recipes and more hydration, that’s why it needs to proof that long.
If you happen to have an instant pot with yogurt button, use that feature to cut the proofing time. Click here for more details: https://livingsweetmoments.com/crusty-instant-pot-sourdough-bread/
Hi! Do you proof the bread in the refrigerator or at room temperature?
room temperature Maple
What about shaping and then a second rise? I’ve been baking bread for a very long time, and seems this is missing a second rise. I followed exactly, but bread looks a little flat?? Smells good though.
What about shaping and then a second rise? I’ve been baking bread for a very long time, and seems this is missing a second rise. I followed the recipe exactly, but bread looks a little flat?? Smells good though.
when using instant yeast there’s no need for a second rise for this recipe