Some people welcome fall with pumpkin spice lattes. Others decorate their houses with pumpkins. Me? I start making candy. Specifically, these Chocolate Covered Apple Cider Caramels, because apparently regular caramel wasn’t delicious enough. I had to add apples AND chocolate. 😂
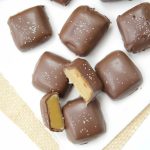
These homemade apple cider caramels have a rich, buttery, chewy center bursting with concentrated apple cider flavor. Each little square is covered in chocolate and finished with a sprinkle of flaky sea salt.
They’re the perfect fall candy for Thanksgiving, Christmas, homemade holiday gifts, or enjoying with a cup of coffee. And yes, I fully support keeping a secret stash for yourself.

Chocolate Covered Apple Cider Caramels
Living in Miami, fall doesn’t exactly arrive with crisp mornings and colorful leaves. It’s more like 85 degrees, humidity, and me pretending that wearing a sweater is a reasonable decision.
But that doesn’t mean I can’t enjoy all those wonderful fall flavors!
These homemade chocolate-covered apple cider caramels are my little taste of autumn, no matter what the thermometer says outside.
They’re sweet, buttery, slightly tangy from the reduced apple cider, and covered in chocolate. The flaky sea salt on top adds just enough contrast to balance the sweetness.
And while making homemade caramel requires a little patience and a candy thermometer, it’s absolutely doable in a regular home kitchen.

The Vermont Trip That Started My Apple Cider Caramel Obsession
Years ago, during a trip to Vermont, I visited Lake Champlain Chocolates and tasted their apple cider caramels.
One bite, and I was hooked.
How on earth did they manage to squeeze so much apple cider flavor into one tiny piece of caramel?
Naturally, I came home determined to figure it out.
And by determined, I mean slightly obsessed.

I started researching homemade apple cider caramel recipes, experimenting with ingredients, and adjusting the texture and flavor.
It took me EIGHT ATTEMPTS to get these caramels exactly how I wanted them.
Eight. As in, eight batches of caramel, eight rounds of sticky saucepans, and eight opportunities to question my life choices. 😂
Of all the recipes I’ve developed over the years, I don’t think I’ve ever had to work so hard on one little piece of candy.
But I finally got there!
The secret was reducing fresh apple cider to concentrate its flavor before making the caramel.
And when that final batch turned out beautifully chewy, buttery, and full of apple flavor, I knew it was worth all the experimenting.

Why You’ll Love These Homemade Apple Cider Caramels
- Real apple cider flavor: Reducing the cider creates a concentrated apple flavor that really comes through in the finished candy.
- Chewy, buttery centers: These aren’t ordinary chocolate candies. The caramel is the star of the show.
- Chocolate and sea salt: A delicious combination that balances the sweetness.
- Perfect for fall: They’re wonderful for Thanksgiving, autumn gatherings, and Christmas candy boxes.
- Great for gifting: The recipe makes approximately 60–70 small caramels, so there’s plenty to share.
- Easy chocolate coating option: You can use chocolate-flavored melting wafers instead of tempering chocolate.
What Makes Apple Cider Caramels Different?
The secret ingredient isn’t really a secret at all. It’s reduced apple cider.
Fresh apple cider contains plenty of water. If we simply pour it into a caramel mixture, the apple flavor can become diluted.
Instead, we simmer the cider until most of the water evaporates, leaving behind a concentrated apple flavor.
That concentrated cider is then combined with butter, cream, sugar, and corn syrup to create a rich homemade caramel.
It’s the difference between a caramel that tastes vaguely fruity and one that actually tastes like apple cider.
And after eight attempts, trust me, I wanted to taste the apples!
Ingredients for Chocolate Covered Apple Cider Caramels
The complete ingredient list and measurements are in the printable recipe card below, but here are a few important ingredients worth discussing.
Fresh Apple Cider
Use fresh, nonalcoholic apple cider, preferably the cloudy kind sold in the refrigerated section during fall.
Don’t confuse apple cider with apple cider vinegar. They’re definitely not interchangeable here!
The recipe starts with 2 cups of apple cider, which you’ll simmer until reduced to approximately 1/3–1/2 cup.
Heavy Cream
Heavy cream gives the caramel its rich, smooth texture. I don’t recommend substituting regular milk or half-and-half because their different fat and water content can affect the finished candy.
Unsalted Butter
Butter adds richness and that wonderful melt-in-your-mouth quality. Use unsalted butter so you can control the amount of salt.
Light Corn Syrup
Corn syrup helps prevent sugar crystallization, which is important for smooth homemade caramels.
This isn’t an ingredient I’d casually substitute without testing. Candy making is a little more particular than throwing together a pasta sauce.
Chocolate Coating
For an easy, no-tempering-required coating, I recommend good-quality chocolate-flavored melting wafers or candy coating designed specifically for dipping.
These products melt easily and set into a firm coating without the extra steps involved in tempering real chocolate.
You can also use real chocolate, but it requires different handling if you want a firm, glossy shell at room temperature.
Flaky Sea Salt
Just a little sprinkle on top makes a huge difference. The salt balances the sweetness of the chocolate and caramel and adds a lovely finishing touch.
Equipment You’ll Need
- A large, heavy-bottomed saucepan
- A reliable candy thermometer
- An 8-inch square baking pan
- Parchment paper
- A sharp knife for cutting the caramels
- A fork or dipping tool for coating the candy
And yes, I strongly recommend the candy thermometer. Caramel texture depends on temperature, and guessing is not our friend here.
A thermometer won’t magically prevent every candy-making problem, but it makes the process much more reliable.
How to Make Chocolate Covered Apple Cider Caramels
Making these candies involves four main steps: reducing the apple cider, cooking the caramel, letting it set, and dipping the pieces in chocolate.
It’s not difficult, but this is definitely a recipe where patience pays off.
Step 1: Reduce the Apple Cider
Start by simmering the fresh apple cider in a saucepan until it reduces to approximately 1/3–1/2 cup.
Reducing the cider concentrates its flavor and removes excess water.
Keep an eye on the saucepan, especially toward the end, because the cider becomes more concentrated as it cooks.
Step 2: Make the Homemade Caramel
Once the cider is reduced, add the remaining caramel ingredients according to the printable recipe card.
Cook the mixture in a deep, heavy-bottomed saucepan, using a candy thermometer to monitor the temperature.
For chewy caramels, I recommend aiming for approximately 248°F (120°C).
Remove the saucepan from the heat promptly when the caramel reaches the target temperature.
A few degrees can make a big difference. Cook the caramel too long, and you may end up with candy that’s much firmer than you intended.
And please be careful! Hot caramel can cause serious burns, so keep little hands away from the stove and resist the temptation to taste it while it’s cooking.
Step 3: Let the Caramel Set
Carefully pour the hot caramel into your prepared 8-inch square pan.
Let it cool and set at room temperature for approximately 4–6 hours.
Yes, this is the part where your kitchen smells amazing and you’re not allowed to eat anything yet. Rude, I know.
Once the caramel has set, lift it out of the pan and cut it into small squares.
Chill the cut pieces for approximately 30 minutes before dipping. This helps them hold their shape and makes the chocolate coating process easier.
Step 4: Dip the Caramels in Chocolate
Melt chocolate-flavored candy coating wafers according to the package instructions, stirring until smooth.
Dip each chilled caramel into the melted coating using a fork. Gently tap off the excess and place the candy on a parchment-lined baking sheet.
Sprinkle with flaky sea salt while the coating is still wet.
Allow the chocolate coating to set completely before serving or packaging.
And voilà! Beautiful homemade chocolate-covered apple cider caramels that look like they came straight from a candy shop.

Tiffany’s Tips for Perfect Apple Cider Caramels
- Don’t skip the cider reduction. It’s what gives these candies their concentrated apple flavor.
- Use a deep saucepan. Hot caramel bubbles as it cooks, so leave plenty of room.
- Check your thermometer. Candy temperatures matter, and a thermometer that’s off by a few degrees can affect the texture.
- Don’t overcook the caramel. Aim for approximately 248°F for a chewy texture, and remove it from the heat promptly.
- Let the caramel set completely. Cutting it too early can make a sticky mess.
- Chill before dipping. Slightly firm caramels are easier to handle.
- Use melting wafers for an easier coating. There’s no need to temper chocolate if you’re using a product designed for candy dipping.
- Add the salt immediately. Sprinkle flaky sea salt over the coating before it sets.
- Work in batches. Keep the remaining caramel pieces chilled while you dip a few at a time, especially if your kitchen is warm.
How to Keep Homemade Caramels Soft and Chewy
If there’s one thing I learned while developing this recipe, it’s that caramel is very particular about temperature.
A few degrees can be the difference between beautifully chewy candy and something that could double as a dental endurance test.
For this recipe, I recommend a target temperature of approximately 248°F.
Keep in mind that the final texture also depends on the accuracy of your thermometer, your elevation, and how much moisture remains in the caramel.
If your caramels turn out too hard, they may have cooked beyond the intended temperature.
If they’re too soft to cut or dip, they may not have reached a high enough temperature.
For best results, use a reliable thermometer and follow the temperature cues rather than relying only on cooking time.
Easy Chocolate Coating Without Tempering
Let’s talk about the chocolate coating for a minute.
Traditional chocolate tempering produces a glossy coating with a satisfying snap. It’s a wonderful technique, but it also requires extra attention to temperature.
And honestly, after spending time making homemade caramel, I don’t think you should need a chocolate-making diploma just to finish the recipe. 😂
That’s why chocolate-flavored melting wafers are such a practical option.
They’re made specifically for melting and dipping, and they set without traditional tempering.
Look for products labeled candy coating, melting wafers, or chocolate-flavored dipping wafers.
Just remember that these are different from pure chocolate. They typically contain alternative fats that allow the coating to set more easily.
Follow the package directions and avoid overheating the coating.
Substitutions and Variations
Homemade candy recipes can be sensitive to ingredient changes, so I recommend following the original caramel formula as closely as possible.
- Chocolate coating: Use dark, milk, or semisweet chocolate-flavored melting wafers, depending on your preference.
- Flaky sea salt: Leave it off if you prefer a sweeter finish.
- Apple cider: Fresh apple cider gives the best flavor. Regular filtered apple juice will produce a different result.
- Heavy cream: I don’t recommend replacing it with milk or half-and-half without testing.
- Corn syrup: Keep it in the recipe unless you’re using a specifically tested alternative caramel formula.
When to Serve Apple Cider Caramels
Thanksgiving
These little chocolate-covered candies are perfect with coffee after Thanksgiving dinner.
They’re also a lovely alternative for guests who say they’re too full for another slice of pie but somehow still have room for a caramel or two.
Christmas and Holiday Gifts
Homemade chocolate-covered apple cider caramels make wonderful edible gifts.
Place each piece in a mini paper candy cup and arrange them in a pretty box or tin. Add a ribbon, and you’ve got a thoughtful homemade present.
They’re lovely for teachers, neighbors, friends, and anyone who appreciates a little something sweet.
Fall Parties and Dessert Tables
Serve them alongside cookies, brownies, and other bite-sized desserts.
The recipe yields approximately 60–70 small pieces, making it a great option when you’re entertaining.
Afternoon Coffee
Honestly, this might be my favorite way to eat them.
One chocolate covered apple cider caramel, one cup of coffee, and five minutes of peace.
Okay, maybe two caramels. Who’s counting?

How to Store Chocolate Covered Apple Cider Caramels
Once the coating has completely set, store the caramels in an airtight container with parchment paper between layers.
Keep them in a cool, dry place away from sunlight and heat. If your kitchen is warm, refrigerate them in a tightly sealed container.
Let refrigerated caramels sit briefly at room temperature before serving so the centers soften slightly.
You can also freeze the coated caramels in an airtight freezer-safe container, separating layers with parchment paper. Thaw them while covered to help prevent condensation on the chocolate coating.
Frequently Asked Questions
Can I use apple juice instead of apple cider?
Fresh apple cider is the best choice for this recipe because it has a fuller apple flavor. Filtered apple juice may produce a milder result.
Why do I need to reduce the apple cider?
Reducing the cider removes excess water and concentrates the apple flavor. This is what makes these caramels taste like apple cider instead of ordinary caramel.
What temperature should homemade apple cider caramels reach?
For a chewy caramel, aim for approximately 248°F (120°C). Use a reliable candy thermometer and remove the saucepan from the heat promptly once it reaches the target temperature.
Why did my caramels turn out hard?
The caramel may have cooked to a higher temperature than intended. Check the accuracy of your candy thermometer and avoid letting the caramel continue cooking in the hot pan after it reaches the target temperature.
Can I make chocolate-covered caramels without tempering chocolate?
Yes! Use chocolate-flavored melting wafers or candy coating specifically designed for dipping. They set without traditional chocolate tempering.
Can I make these caramels ahead of time?
Absolutely. You can prepare the caramel one day, allow it to set, and dip the pieces in chocolate the following day.
Can I freeze chocolate covered apple cider caramels?
Yes. Freeze them in an airtight container with parchment paper between layers. Thaw them while covered to minimize condensation.
Chocolate Covered Apple Cider Caramels Recipe
These homemade chocolate-covered apple cider caramels are a little labor of love, but they’re absolutely worth it.
After eight attempts, I finally achieved the rich apple flavor and chewy texture I was looking for.
And the best part? You get to enjoy the finished recipe without washing eight batches’ worth of sticky saucepans.
You’re welcome! 😂

If you make these Chocolate Covered Apple Cider Caramels, I’d love to hear how they turn out! Leave a comment below, or share a photo on Instagram and tag @livingsweetmoments or use #LivingSweet.
Chocolate Covered Apple Cider Caramels
Ingredients
For Cider Caramels
- 2 cups fresh cider
- 2 cups heavy cream
- 2 cups sugar
- 1 cup corn syrup
- 1/2 cup unsalted butter 1 stick
- 1/2 teaspoon cinnamon
- Pinch of salt
For Chocolate coating
- 1 lb chocolate-flavored melting wafers or candy coating (dark or semisweet flavor)
- Coarse salt for tops optional
Instructions
- Line an 8x8" square pan with parchment paper leaving an overhang paper on the sides for easy removal. Spray nonstick spray over the parchment paper
- In a large saucepan, pour the cider and boil on medium heat until the cider reduces to 1/2 or 1/3 cup. This takes about 20-25 minutes (watch it closely because the cider can burn)
- After the cider is reduced, add the butter, corn syrup, heavy cream and sugar. Cook this mixture over medium-high heat.
- Insert a candy thermometer and cook until the caramels reach 248 Degrees F. About 20-25 minutes
- Immediately remove from heat and add the cinnamon and salt. Mix
- Pour into the square pan and leave it on the counter to set. About 4-6 hours
- Remove from mold and cut into caramels
- Place the caramels on a sheet pan lined with parchment paper and place in the fridge for a minimum of 30 minutes to harden
For Chocolate Topping
- Melt the chocolate-flavored wafers according to the package directions, stirring until completely smooth.
- Using a fork, dip each chilled caramel into the melted coating. Gently tap the fork against the edge of the bowl to remove excess coating.
- Place the dipped caramels on a parchment-lined baking sheet and immediately sprinkle with flaky sea salt, if desired.
- Allow the coating to set completely before serving or packaging.
Notes
- Use fresh apple cider: For the best flavor, use fresh, cloudy apple cider rather than clear apple juice. Do not use apple cider vinegar!
- Don't skip reducing the cider: Simmer the 2 cups of apple cider until only 1/3 to 1/2 cup remains. This concentrates the apple flavor and is the secret to these delicious homemade caramels.
- Use a candy thermometer: Cook the caramel to 248°F (120°C). A few degrees can make a big difference between soft, chewy caramels and hard candy. Make sure the thermometer isn't touching the bottom of the saucepan.
- Be patient: Allow the caramel to set at room temperature for 4–6 hours before cutting. Refrigerate the pieces for at least 30 minutes before dipping them in chocolate.
- For the chocolate coating: Follow the original chocolate-and-butter method in the recipe. Melt the chocolate gradually to avoid overheating, and stir until smooth.
- Make them ahead: Prepare the apple cider caramels one day and dip them in chocolate the next. This makes the process much easier, especially during the holidays.
- Storage: Store the finished caramels in an airtight container with parchment paper between layers. Keep them in a cool place, or refrigerate if your kitchen is warm. Allow them to soften slightly at room temperature before serving.
- For gifting: This recipe makes approximately 60–70 chocolate-covered caramels. Place them in mini paper candy cups and package them in pretty boxes or tins for Thanksgiving, Christmas, or homemade holiday gifts.
Nutrition
More Fall Treats You’ll Love
If you love homemade caramel and cozy fall desserts, try these other recipes from Living Sweet Moments.
Peanut Butter Caramel Popcorn Bars

Roasted Caramel Apple Crisp






Candy is one of my favorite things to make, especially caramels but I find most of the recipes don’t fully set up so if I don’t store them in the refrigerator they are so sticky. Can’t wait to try this recipe!
let me know what you think Thomas
Your Temperatures are wrong…Even king arthur flour site says 248 F. Just thought I should let you know so you could edit it.
Oh my goodness Gene! You’re absolutely right… I was off about 100 degrees. I apologize for that. Just corrected the recipe.
Thank you.
Recipe tastes great, definitely has a nice apple flavor. On a side note, I. had never melted chocolate in the microwave before, and ended up having my chocolate sieze, so I went back to using double boiler method and everything worked out ok.
I’m glad you liked them! We are addicted to those caramels..especially with the chocolate.
I’m so sorry your chocolate scorched in the microwave. Usually, I burst it for short intervals, remove, stir and then burst it again but a double boiler is definitely the better and fool-proof method.
Thanks for stopping by!
Hello Tiffany can you use apple juice in the place of the cider ?
Hi Honey, the flavor wouldn’t be the same. Cider is basically raw apple juice that still has the part of the pulp.
Your recipe says fresh cider. Is that the reduced cider?
Hi Betty, in the recipe we reduce the cider (see step 2) 🙂
do these freeze well?
They do Heidi, you can even freeze them with the chocolate. First place them on a flat tray to freeze, then when they are completely frozen, just toss them in a zip top bag.
Hi Tiffany. Made these last weekend and when the caramel set it was really hard and brittle. Used the candy thermometer and took the caramel off the heat right at 250. Any suggestions on how to soften the caramel for the next time, I’m thinking cook it to a lower temp? Thanks.
That seems odd! I am so sorry about that Brian! At 248 they shouldn’t be hard. Did you take a lot of time taking it off the heat? Or did you insert the thermometer in the shallow part?
Took the pan right off the heat and the thermometer was inserted pretty deep into the liquid. I did leave the caramel in the saucepan for a few minutes before transferring it to the 8×8. Maybe that was enough to raise the temp a bit?
I don’t eat a lot of sweets Tiffany, but boy they look good.
Indeed! they super flavorful