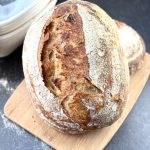
This Instant Pot sourdough-style bread has a crusty exterior, soft interior, and tangy flavor, without using a traditional sourdough starter. It is an easy yogurt bread for days when you want the vibe of sourdough without the multi-day commitment.

Instant Pot Sourdough Style Bread (2026 Update)
This bread has been one of the most popular recipes on my site for years, and after revisiting it in 2026, I wanted to make one thing much clearer right from the top: this is not a traditional sourdough loaf made with a fermented starter. It is a quick yeast bread made with yogurt to mimic that tangy sourdough flavor.
And honestly, that is exactly why so many people love it. You get a chewy crumb, a crisp crust, and that cozy bakery aroma without spending days feeding a starter or waiting through a long fermentation schedule.
So if you are here looking for a shortcut loaf with sourdough-style flavor, you are in the right place. If you want true sourdough made with a live starter, check out my Sourdough Starter Series: From Starter to Confident Baker and my day-by-day sourdough starter guide.

Is This Real Sourdough Bread?
No. This is not true sourdough bread because it does not use a fermented sourdough starter. Instead, it uses commercial yeast for rise and plain Greek yogurt for tang and depth of flavor.
That makes it more of a sourdough-style bread or yogurt bread. It is faster, easier, and beginner-friendly, but it does not have the same fermentation process or the same characteristics as traditional sourdough.
What Gives This Bread a Sourdough Flavor?
The tangy flavor comes from the yogurt. It adds acidity and richness, which helps mimic some of the flavor people associate with sourdough. It is not identical to a long-fermented loaf, but it gives this bread a delicious depth that feels much more interesting than a standard white yeast bread.

Why You’ll Love This Recipe
- No sourdough starter needed
- Tangy flavor from yogurt
- Proofed in the Instant Pot
- Crusty outside and tender inside
- Great for toast, sandwiches, and croutons
It is the kind of loaf that feels impressive but does not ask you to rearrange your entire life around bread, which frankly is a quality I appreciate.

Can You Use Store-Bought Yogurt?
Yes. Homemade yogurt works beautifully, but store-bought plain Greek yogurt also works very well. The main thing is to use an unsweetened yogurt with a thick consistency so the dough is not overly wet.
Can You Use the Instant Pot for Baking This Bread?
The Instant Pot is used here for proofing, not for baking the finished loaf. The actual baking happens in a preheated Dutch oven in your regular oven. Since several readers were confused by the original title, I wanted to spell that out clearly here.

Important Instant Pot Proofing Tip
Use the Yogurt setting on Low for proofing. Several readers had trouble when using the wrong setting or an Instant Pot model without that function. If your model does not have a Yogurt setting, it is better to proof the dough in another warm, draft-free place instead of guessing with a hotter setting that may partially cook the dough.
Why Didn’t My Dough Rise?
The most common reasons are expired yeast, using the wrong proofing setting, or a dough that is too dry. Make sure your yeast is fresh, your Instant Pot is set correctly, and the dough feels soft and workable. If it looks dry when mixing, add a little more yogurt, one tablespoon at a time.
Why Is My Bread Dense?
A dense loaf usually means the dough did not proof enough, the yeast was not active, or the shaping was too tight. Dense bread can also happen if the dough is under-hydrated or if the loaf is cut before fully cooling.

Serving Ideas
This bread is delicious warm with butter, but it is also great for:
- Morning toast
- Sandwiches
- Soup on the side
- Homemade croutons
You can also add garlic, herbs, or finely chopped olives for variation if you want to play with the flavor.
How to Make This Instant Pot Sourdough Style Bread
First, mix the flour, yeast, and salt.

Add the yogurt and mix until a dough forms.

Knead briefly and shape into a ball. It does not need to look perfect.

Line the Instant Pot with parchment, place the dough inside, close the lid, and proof on the Yogurt setting on Low for about 4 hours.

Once doubled, remove the dough and shape it gently on a floured surface.

Transfer to the counter, shape into a ball, and let it rest while the Dutch oven preheats.

Preheat your Dutch oven in a 450°F oven for 30 minutes. Keep the dough covered while you wait.

Carefully transfer the dough into the hot Dutch oven, score the top, cover, and bake for 25 minutes.

Uncover and bake 8 to 10 minutes more, until browned and crusty.

Cool before slicing, then enjoy.

I hope you can try this easy Instant Pot sourdough-style bread at home. If you do, please upload a pic on Instagram and tag me @Livingsweetmoments or use the hashtag #LivingSweet.
Instant Pot Sourdough Bread
Ingredients
- 3 cups Bread Flour
- 1 1/2 teaspoons Salt
- 3/4 teaspoons Instant Yeast
- 1 1/2 cups Unflavored Greek Yogurt more may be needed
Instructions
- In a bowl, mix the flour, salt, and yeast
- Add the yogurt and mix by hand until a dough is formed. If the mixture is too dry add 1 or 2 tablespoons more of the yogurt
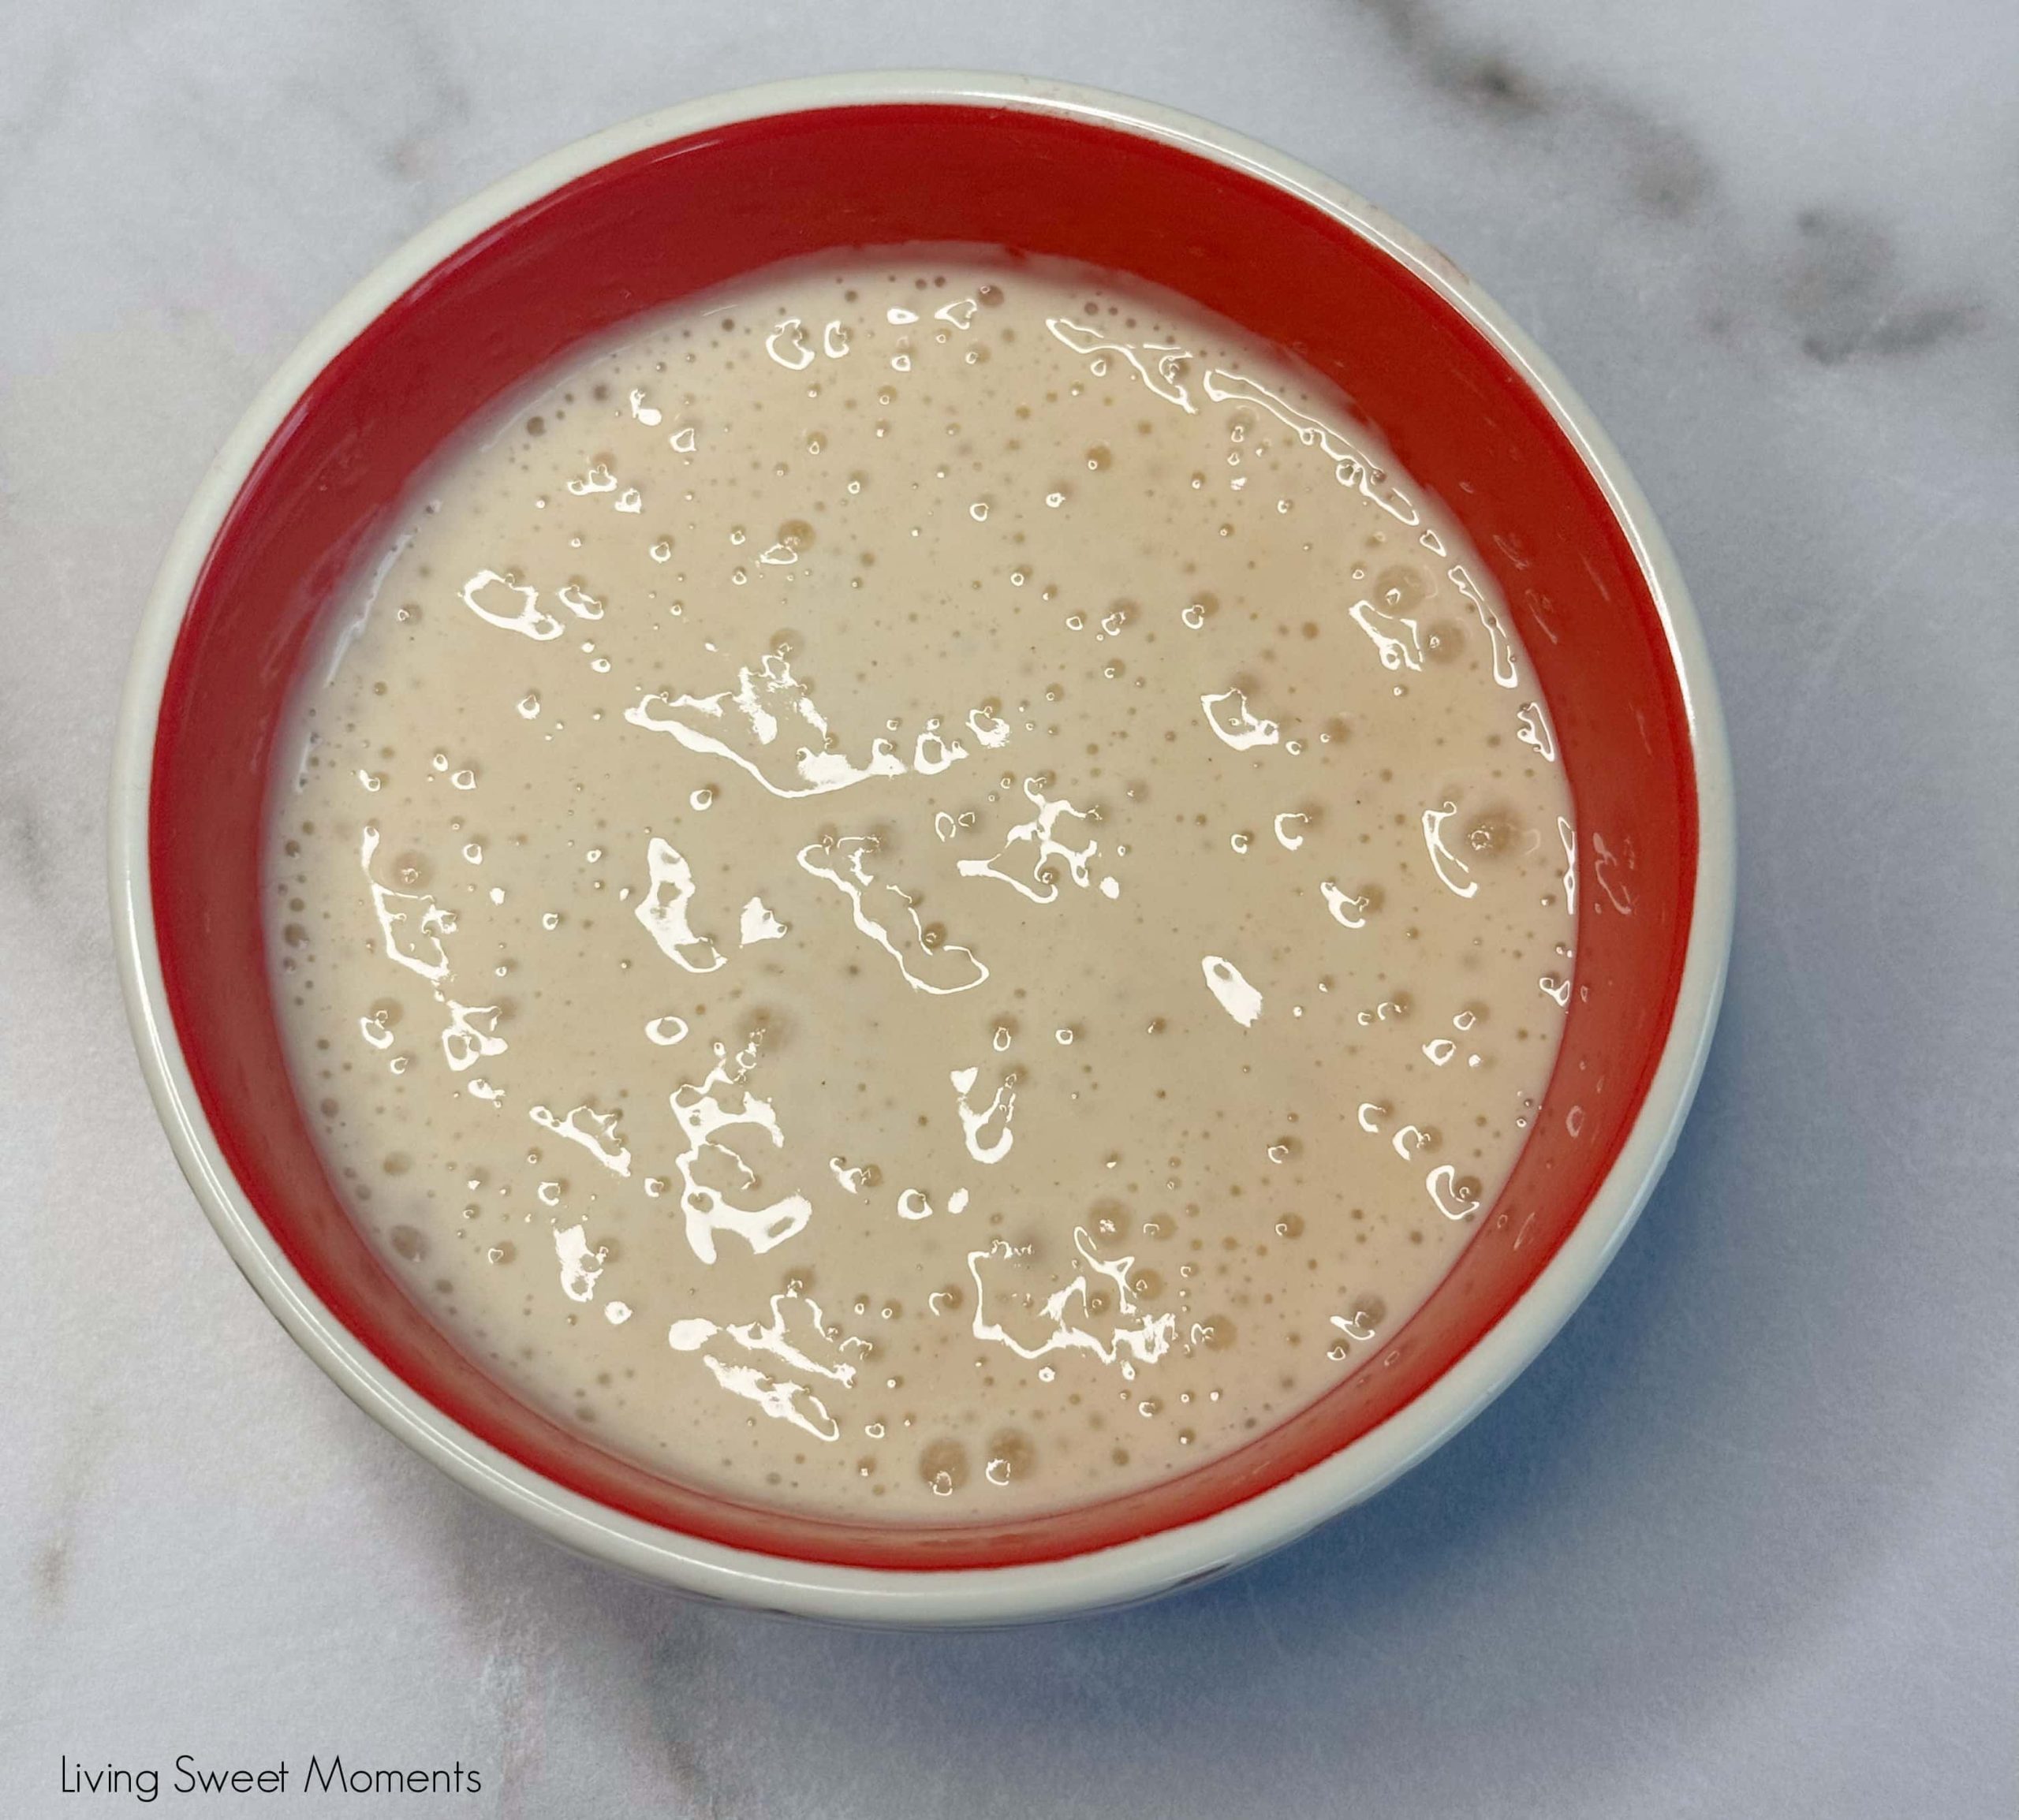
- Form a ball. Line the Instant Pot with parchment paper and place the dough ball inside. Cover with the lid on and press the Yogurt button.
- Let the dough proof inside the IP until the timer displays 4 hours
- Remove the dough from the IP and lay on a floured surface. Knead and shape into a ball. Cover with a tea towel or set on a floured proofer basket and cover.
- In the meantime, preheat a dutch pan in the oven at 450 F. for 30 minutes
- Carefully place the dough ball in the dutch pan. Score the top with a knife and place lid
- Bake cover for 25 minutes. Remove cover en bake for 8-10 more minutes or until browned
- Remove from oven and cool on a rack
- Enjoy!
Nutrition
You May Also Like
Sourdough Starter Series: From Starter to Confident Baker
How to Make a Sourdough Starter and Maintain It
Instant Pot Yogurt

Crusty Rosemary Olive Bread


Can I use Whey instead of yogurt for this bread or maybe half whey half yogurt?
Yes Bev. You can use all whey if you’d like. Simply mix it with the dough. If it feels a little dry, add 1-2 tablespoons more of whey
Please help new to IP bread want to do it right so bad all my batches aren’t rising well following directions exactly 🤷♀️🤷♀️ Please help
Hi Sheila! Make sure your yeast has not expired and that you are using the yogurt button on the IP yo proof your dough
Tiffany, my instapot doesn’t have a yogurt setting. Should I use porridge?
Hi Joyce! don’t use the iP to proof. Just heat your oven on to 100 degrees F and proof there
What do you use on the yogurt setting ? Low, ned, High ?
low
Sheila, I let mine rise for a total of 60 mins between proofing/kneading and baking and that helped me! 30 mins just in the towel and then 30 mins of heating the Dutch oven
I am not new to baking or sour dough, but I wish I read the comments prior to making this. I just wasted all these ingredients during Corona Virus! Mine did not rise as described. Probably needed more time, but I followed the directions exactly. I think the directions should be edited to stress the possible need to more time to rise. Using IP was also a waste IMO. Disappointed.
So sorry the recipe did not work out for you Kate. Your bread should have risen. Did you use the correct kind of yeast? Active dry or Instant?
Yes, used the correct yeast and I know it’s fresh because I’ve baked other breads. I really think it needed much more time to rise than recipe states. I’m making some yogurt in my Insta pot, so if I can find more flour, I’ll give it another try.. I loved the “sour flavor” in the small piece I tried. But, we tossed the failure.
As you can see in the comments, the recipe has worked for a lot of people. Normally this recipe takes around 12-16 hours to proof. Using it in the iP it speeds up the fermentation considerably.
The first time I did this recipe I accidentally used regular yeast and my dough rose. This time I used the yeast recommend and nothing. My dough did not rise and what sucks is I made two batches to have enough bread for the week. All waist
Oh no Mia! that’s a shame! Your dough should have risen. Did you cover the IP during proofing? Was your yeast not expired? Before baking did you check that it rose?
Your recipe looks great but doesn’t mention sifting the flour. I haven’t made bread before. Should I sift?
No, it does not need to be sifted
I’ve made this bread twice iand both times the bottom is burnt. I think putting the Dutch oven in the oven for 30 minutes is the culprit. What do you say?
That has never happened to me Cassie. So yes, try it without preheating the dutch oven
I’ve had that happen before as well. You can put a baking sheet under thre Dutch oven while baking. I also use parchment paper under the bread in the Dutch oven.
Do we use all of the whey in place of the yogurt. It calls for 1-1/2 cups of Greek yogurt so can I substitute it for 1-1/2 cups of the yogurt?
Hi Linda. I haven’t tried it with whey
what size dutch pan do you use to bake?
I have a medium oval one but you can use a round one if that’s what you have
I’m inexperienced…. are you refering to a dutch oven or something else? Also, what size… If dutch oven, I have 8, 10″ and 12″
Hi Sharon! Yes, dutch oven, 8″ is fine
I’m wondering if I could use a regular stainless steel pot with a lid?
Yes!
I’m so excited to try this but don’t have a baton or Dutch oven. I do have stonewear. But no stainless bowl. Any other way
Yes Tammy! use a sheet pan. You won’t be able to obtain a crusty crust but it will be delicious regardless
Why would I raise in pot for 4 hours when I can do that on counter for an hour?
Sounds like a great recipe otherwise
Because it would take 24 hours to proof in the counter
HI Tiffany, so if I want to proof it on the counter top instead of IP do I need to leave it there for 24 hours? Is that the exact equivalent? I was thinking may be I can leave it overnight on the counter.
Yes, you can leave in a place where there’s no draft. Either on the counter, inside a cupboard, for 12-18 hours. Or if you’re in a rush (ish), you can turn your oven to 100 F and leave it there for 4-6 hours
Wow! That was fast! Thank you! I
no problem! let me know how it comes out!
I don’t have a Dutch pan. Can it be baked in an oven?
Yes you may! check the comment section and see what other people used successfully. A cast-iron pan is a great alternative.
Can I use active dry yeast instead?
yes, Jen! In a small bowl add your active dry yeast, mix in 2-3 tablespoons of warm water (not hot, not cold). Cover with a kitchen towel and let it rest for 10-15 minutes. Proceed with the recipe
A Dutch Oven is a pot, usually made of cast iron or something similar. It is not a kind of oven. I think you misunderstood.
Hi Tiffany, i do not have an instant pot or a dutch oven how do i make this recipe a success without those?
Hi! You can proof in your oven (as long as it’s turned off) – the proofing will take longer.
Also, without a dutch oven just use a cast iron pan.
My family really likes sour, can I add more yogurt to make it more sour and would I have to compensate anywhere else if I do this?
Hi Barbara, I wouldn’t add more quantity of yogurt, simply use a very sour yogurt like a greek kind.
I am new to the instant pot world and bread making. What do you mean by proof? What setting is this? What do i do??
Hi Rachel. Press the yogurt button to “proof” (ferment) the bread
I don’t have a yogurt button on my Instant pot. Is there another setting for this?
Hi Rachel. Just proof your dough in the oven at 100 degrees. Make sure you cover the bowl
I also do not have a yogurt button. When you say “make sure you cover the bowl, what should I cover the bowl with? I am intrigued with this recipe,
Hi Sara, just cover it with a clean kitchen towel or plastic wrap
My oven doesn’t go any lower than 170 degrees – how about using the steam feature since I don’t have a yogurt selection
Hi Julie! you can also proof the dough inside a cabinet of your house. No need to use the oven or the ip
For how long?
If you use this method Nicole, is best if you leave it overnight since there’s so little yeast and so much liquid.
If I proof the dough in my oven at 100 degrees, covered, how long should it stay in the oven?
Around 4-5 hours Ariella
A tip my mom just taught me is to turn on the light in the oven to warm it up just a bit. This works for ovens that won’t go down to 100.
Wow! what a great idea Shelly! thanks for sharing!
Hi… I’m new to this, but I had a quick question. I noticed that in the beginning of this article, as you were describing how much of a hit this recipe was with your family, that you mentioned after making your 1st loaves, you substituted condensed milk out, w/ yougurt instead. The only option I see on your recipe asks for yogurt.
Can you confirm for me what the measurements & recipe changes would be if I used condensed milk instead? I live in NY & we are under mandatory shelter in place orders. I can’t make yogurt, as I only have 2% milk on hand… but I do have condensed milk.
Thank you!
Hi Becky! I am sorry, I think you misunderstood me. The yogurt was made with condensed milk, not the bread. If you substitute the condensed milk for the yogurt in this recipe it will yield a sweet and not a sour bread.
If you don’t have yogurt on hand, use sour cream or buttermilk (mix 1 cup of milk with 1 tb of lemon juice or vinegar and let it sit for 5 minutes and mix).
If you need recipes with condensed milk let me know! I have tons!
Stay healthy in NY. We are in Florida and still awaiting orders for shelter in place.
What setting would you use if my Instant Pot doesn’t have a Yogurt button? TIA
then proof in a very low oven (100 F)
Do I have to use a lid? I have a cast iron pan I can bake it in but no lid
Yes! I used a lid… It really makes a different sealing in the heat
The lid of my dutch oven has a metal knob is it ok to go into the oven.
Mine does too and I’ve never had a problem with it
I am Celiac. Do you need to change the ingredients .and amounts for gluten free flour?
Hi Loretta. Unfortunately, for celiac you may need different ingredients to create a gluten free bread. I recommend this recipe: https://artisanbreadinfive.com/2014/11/03/master-recipe-from-gluten-free-abin5/
If I grind my own wheat do I have to add anything to it .
I have no idea Donna. Apologies, I’ve never tried freshly milled flour in my baking
Thank you for the recipe and thank all the people for questions ( and your answers, of course) that have helped me during the process 🙂
You’re welcome!! Let me know how it comes out
Hi! Can I use vanilla flavoured Greek yogurt?
of course Liz!
Your rosemary olive bread looks so good. Do you think it could be made following the directions for your sourdough bread?
Thanks!
Yes Carla! Just proof in the IP for 4 hours instead of overnight in the counter
I had to use almost double the amount of yogurt to get it to snap into a ball without falling apart. I bought plain strained Greek yogurt. Should I have gotten the unstrained Greek instead of strained. Do you think this will affect my outcome? I have just put into the instant pot so I will not know anything for at least another 4-5 hours. Thank you
Depending on the brand of flour used some absorb more liquid than others, that’s why the quantity of yogurt needed can vary.. I don’t thin it will affect the outcome. Let me know how it comes out after proofing. If you feel the ball is super sticky, add a bit more flour
I used King Arthur bread flour. It was between that and Pillsbury bread flour. If anything I worry it may be too dry. I added a lot more yogurt than called for but was nervous I was adding too much. I will let you know how it comes out. Thank you.
you’re welcome!
I’m in the same boat. I just used the full two cups of yogurt. I didn’t have more so I let some of the dry flour fall off. It didn’t feel like any kind of bread dough I’ve ever done. I was tempted to use my mixer thinking that was it but the r3cioe clearly states by hand. I used a dough whisk. Like you I’ll know in several hours. Did yours turn out?
Do you grease the Dutch oven before putting the dough ball in it?
I did not and it didn’t stick. But you can grease it with nonstick spray just in case
Is that calorie count correct? What is the “serving size”? That seems really high.
Julia the calorie count is for the whole bread… and it’s a big loaf
I just updated the servings to slices…
Can I use 0% Greek yogurt or is it best full fat? I don’t have a ‘Dutch oven what else can I use please?
yes you can Deborah! And if you have a pizza stone, cast iron pan it’ll work as well
Hi, if I use a pizza stone, it would be uncovered, right?
correct Sharona!
You can use a stockpot that has a lid. My dutch is ven is too big for bread so I use my stock pot.
thanks for the tip Jerry!
Thanks for the recepie! This was my first time making bread and it’s yummy but very dense….any suggestions? I followed the recepie and used fage Greek yogurt.
Thanks!
Dense, could be it needed a little more rise time.
What step is this – I had the same issue. It was good, but very dense.
If your bread did not proof (grow) you may have used the either expired yeast or the wrong one. For this recipe you need instant yeast not rapid rise
I ended up using 1 tsp of active dry yeast because I didn’t have instant. I googled the correct amount to use and did a full 2 cups of Greek yogurt to get it all to go together in a smooth ball. I’m hoping this works because this is the 5th time I’ve made this recipe and I’ve been trying to trouble shoot why it is always so dense and never rises. We will find out in 4 hours!
I grew up overseas and always had dense bread. It’s my favorite!lo
Glad you liked it!
Hi, can’t wait to try this. I’ve never used the yogurt feature on my Instant pot, should I close the vent? Thanks
It’s not necessary Robin since you’re not cooking under pressure
Thanks!!:)
I’m not sure exactly about this…I’m sure it is important. I’ve pressed the yogurt button, but do I vent or seal?
It makes no difference Melanie since you’re not pressure cooking 😉
Thank you for a much quicker way to make crusty bread! Tip: I leave my bread on parchment paper while pot is heating in oven, then set it, with dough, directly in pot & bake. Easy peasy clean up & transferring to cooling rack too.
Oh, that’s a great tip, Lisa! it will make it much easier to transfer the dough to the hot pot. Thanks for sharing!
After I combined flour,salt and yeast, I realized I had used active, not instant yeast. Apparently active yeast must be dissolved in water – which I did not do. Dough is now in my IP. Will I get a surprise after 4 hours? I so want this bread to be good! But have I goofed?
Hi Carolyn, your yeast most likely did not activate 🙁 Let me know what you encounter when you open the IP
Hi ladies! I did the same thing…and to update people, it still turned out delicious! Don’t fret!
Glad you liked it Megan! thanks for letting us know
Do you have to use bread flour? I don’t have it only all purpose. Guess. I need to look up difference
You don’t have to Kristi. You can use regular flour. Usually when making bread I’ve always to use bread flour since it has higher gluten content
If you have regular flour take and whisk the floue a minute or two to get air into the flour.
You can use regular flour Ruethe
I realized after buying all the ingredients and about to mix them together that I didn’t have a stock pot that is oven safe! Do you think I could use my IP pot and cover with foil?
Hi Sarah! Do you have a pizza stone, or cast iron skillet?
Unfortunately not 🙁 I just bought a dutch oven and it will be delivered later this week…but I don’t want to wait that long!
You can also use the insert of a crockpot and cover with foil I have done that many times with this type of bread.
Love this idea Gina!
If I use my pizza stone- do I still need to cover it? Im not site how I would is all
Yes, cover it for at least 15 minutes with a bowl or a big pot. It will help to lock in steam and create a wonderful crust
I’ve made this bread 3 time now and we enjoy it very much! Ive been using traditional yeast and regular flour without any issues. The only problem I’ve had is with the dough sticking to the pachment paper, even though it feels nice and dry when I put in in the pot. Any suggestions?
Glad you like the recipe Catharina! Just spray the parchment paper with nonstick spray and sprinkle some flour before putting on the dough.
I put a little cornmeal on the paper and the bread doesn’t stick
thanks for the tip Sandy!
Can you use a dairy free thick yogurt- vegan?
Yes Sharon! it would work just fine
Please tell me what proof means and what a proofer basket is. Also, do you bake the bread at 450 degrees also? New to instant pot and have not made yogurt yet or used that setting but want to try this. Thanks
Hi Pam, a proofer basket is used by bakeries to grow the bread in a certain shape. If you don’t have it, you don’t really need it for this recipe, is just for aesthetics purposes only.
The bread bakes at 450 degrees F to get it nice and crispy.
I just made this bread today for Easter and it was sooo good!! i had to use a few more tablespoons of yogurt to keep it together and form a ball, but this recipe was incredibly easy. Thank you!
You’re welcome Heather! So glad you liked it 🙂
I don’t have a pizza stone or Dutch oven. Can I just use a regular cookie sheet??
You can Abby! I recommend placing a pan in the rack below and add some water and ice to it. The steam from the ice will help create a crust for the bread
Hi! Can I just proof the dough overnight? I don’t have an instant pot. Thanks!
Yes Teresa! You can proof is overnight covered inside a cabinet or an oven (as long is turned off)
Can I start this in the IP then use my bread machine ?
of course Rhonda!
Wondering about the yeast…can I use “rapid rise” yeast? I don’t know what instant yeast is.
Diane, there 2 types of yeast: rapid rise and instant – for this recipe I recommend instant since it does not need to “activate” with warm water like the rapid rise needs.
Hi Tifanny ! Did u mean, active dry yeast and instant yeast (also referred as rapid rise) are the two types of yeast?
Can I use plain whole milk yogurt instead of greek?
Hi Diane, instant yeast – rapid rise. And yes, you can use whole milk but it won’t have that wonderful sour flavor
Hi Tiffany, in a previous comment you said that you should not use rapid rise yeast. Why? The rapid-rise does not need activation. The active dry needs activation. There also seems to be a difference between rapid rise and instant yeast. So apparently there are three types of dry yeast: instant yeast, active dry yeast and rapid-raise yeast. From these three only the active dry needs activation.
In another comment you said that you can use active dry but just have to activate it with 2-3 spoons of warm water. I assume the same goes for fresh yeast (cake yeast).
Hi Gerry! yes, fresh yeast (cake yeast) needs to be activated, although the last time I saw that yeast was in Venezuela many years ago, I have never seen in in the US. Were you able to find it?
Oh, now I see!! I read all those recipes on American websites and they talk only about instant yeast and I don’t get it why… I live in the Netherlands (Europe). Every Turkish shop here sells fresh cake yeast. Also every bakery around the corner sells it too and it costs pennies.
Thank you for the recipe. Looking forward to trying it!
Does this bread have all of the health benefits of sourdough bread? Or does it just taste like sourdough?
Hi Meredith. I don’t think the health benefits of real sourdough bread would apply to this recipe. Sorry 🙁
I am new at baking bread and this recipe is so easy and very delicious. I will make this again and again!
Awesome Jami! glad you liked it… Now that you see how easy it is, you can add herbs, chopped onions, etc
Hi Tiffany, I put mixed the dough on the lowest setting with my Kitchen Aid using bread paddle. I had to use 3-4 more TBLS to get it to come together. I made a ball but didn’t “knead” 1-2 minutes. I put it in pot in wax paper ad I didn’t have parchment. After 4 hours on yogurt setting, it did not rise. Any idea why? I am going to let it sit overnight in a covered put in oven and see if it proofs. Just curious what could have done wrong?
Hi Kris. Did you use instant yeast or rapid rise? did you check the expiration date of the yeast?
Hi! I made this today and it was so close to being perfect. I assumed when you said Instant Yeast, that meant I should use Rapid Rise. Should I be using Active Dry Yeast instead? Thanks for such a great recipe! We all loved it!
Hi Lyndsey! not active dry yeast because that needs activating. Rapid Rise (instant yeast) – the yellow envelope with the blue letters is the one you need
Thank you for clarifying!y whole family can’t wait for me to make this again!
You’re welcome Lyndsey! Happy Baking!
Hi Tiffany, the recipe says “instant yeast”. Here you say the “rapid-rise instant yeast”. These are two different things. The rapid rise contains enzymes and other additives to make the dough rise faster. These are in addition to what is in the package of “instant yeast”. So I think this should be clarified. Could it be that this is the reason the dough didn’t rise for some people? Is the rapid-rise that makes the difference?
Which yogurt setting? I assume “low” instead of the “normal” setting you use to culture yogurt?
Yogurt setting is low
Will this recipe work in my 3qt IP? Or will there not be enough proofing space?
You may need to halve the recipe Nikki
Hi! I’m new to bread making…in step four you say “proof in IP until time reads 4 hours.” Does the dough actually stay in for four hours?
And after you place it in the preheated Dutch oven, does the Dutch oven go back in the actual oven to cook?
Thanks for the help, and receipe! I’m excited to try this.
Question 1 – yes!! it stays in there for 4 hours
Question 2 – Yes, you place the bread in the preheated dutch oven and then place the dutch oven in the oven to cook
Hope that helps!
Ok first attempt I had just put in IP when I read about the different types of yeast. Went back to the store bought more yeast and yogurt and started again. It is currently proofing. I have one question can I preheat Dutch oven while it is prodding or does it need to stay on counter for the 35 minutes. Trying to have it ready for dinner.
The dough needs 2 stages of proofing for maximum effect. If you want to have it ready for dinner, proof it in the IP for 3 hours instead of 4 and don’t skip the proofing on the counter.
Let me know how it comes out!
Thanks Tiffany. Good to know. It was tasty but a little dense and not sour. That being said the whole loaf was devoured. ??
Thanks for your feedback Mary! Now onto bake the next batch!
Can you use sour cream I stead of yogurt?
You can!
Thanks Tiffany for sharing this recipe. Can’t wait to try it. I don’t have an IP so if I proof it in the oven at 100 F as you suggest, is it also for 4 hours as well?
Yes Martin! 4 hours minimum. If you see that the dough hasn’t risen leave for 2 hours more
I don’t have any parchment paper on hand. Is there an alternative method you would recommend?
Yes, use wax paper or simply flour the bottom of the surface of the ip
I went to grab the parchment paper and discovered we’d run out. Didn’t have any wax paper so I’m using my silicone baking mat in the IP and probably in the Dutch oven! I hope it works!
If I want to make two loaves should I split them in the beginning or after they’ve risen for the first proof and before the 2nd proofing?
Thanks Tiffany….
Split them after the second proof. Also, the silicone baking mat will work just fine!
For proofing in the oven, try leaving the on the light to provide low temp .
perfect!
I don’t have an IP I have the power pressure cooker xl. There is no yogurt button. Any suggestions.? I purchased all the ingredients but I’m very green and have never made bread before! What does the yogurt button function do exactly? Maybe I can mimic it on my cooker.
No problem Sydney! Just turn your oven to the lowest setting and proof your dough in a covered bowl for 4-5 hours
I made this bread twice in a week as my son- in- law loves sour dough bread. It was delicious both times and a big hit. It’s also very forgiving as I put too much yogurt in the first time. I will make this bread often!
Glad your family liked it Lori! next time you can add some herbs, parmesan cheese, etc – to give it different flavors 😉
I am so impressed how you answer each question. Most sites don’t. My question is my Fleischmann’s yeast says “Rapid Rise, Instant yeast”. I believe you listed those as separate types of yeast. Is mine good to use? 4 yrs ago I made this bread w/o the I.p. but using water. It was a beautiful loaf but not especially tasty. How ingenious to add yogurt. Can’t wait to try it.
Yes Rochelle, rapid rise is the correct yeast. Please let me know how it comes out 🙂
this contradicts what you previously said. I’m confused.
Hi Lisa, instant yeast is the correct one to use in the recipe, active dry won’t won’t work since it needs to be activated. Is that the confusion?
In a previous post you said “don’t use rapid rise yeast”. So this is the confusion I guess. So from the 4 kinds we know: 1) instant yeast; 2) rapid-rise instant yeast; 3) active dry yeast; and 4) fresh yeast which ones can we use?
Also in another post you mentioned that active dry can be used but you have to activate it. I think it would be easier for you to clarify all these things in the recipe text to avoid so many questions. Also, I think some people are proofing in the normal yogurt setting while it should be in the “low” yogurt setting. Also not clear from the instructions.
Hi Gerry! sorry for the confusion. For this recipe, instant or rapid-rise yeast is needed for this recipe. Now since a lot of us are on quarantine and is hard to go out, I commented that the recipe will work with active dry (just needed to be activated). Sometimes we have to adapt to the circumstances 🙂
Thank you. Clear now.
Bread looks delicious. Can’t wait to try it.When I put Dutch pan in oven should I turn off the oven .
I mean while heating for 30 minuets
I made Your CRUSTY INSTANT POT SOURDOUGH BREAD today, it was wonderful. My husband loves a crunchy crust, he was in heaven eating this bread with dinner tonight. I had whey from yogurt I made, perfect use for it. Thank you for great recipe and instructions!
Thank you Nancy! glad you and your husband liked it!
No, leave it on so the dutch pan preheats. That’s what creates the nice crusty bread
I dont Have a Dutch oven. Can I bake It in so eth8ng else?
Of course Mary! Do you have a cast iron pan?
Made the sour dough bread today my first attempt we love sour dough & tried to make the traditional way of making a starter but the bread was really heavy & didn’t taste good. So thought I’d use your recipe, must say it has risen & cooked really well. I uaed my oven to prove the dough & then followed your instructions. Thank you for sharing your recipe Tiffany.
you’re very welcome Usha! I’m glad you liked it! Thanks for stopping by and sharing your feedback
Hi Tiffany, we are plant based people and wonder if a Greek plant based yogurt would work?
Hi Caroline! yes, a plant based yogurt works fine in this recipe
I am so excited to try this recipe! My loaf is currently proofing in the IP. I did have to add two more Tblsp of yogurt to get the loaf to come together…but I’m not sure that was enough. I used King Arthur bread flour and that really seemed to suck up the moisture. I guess I’ll wait and see! What an ingenious way to make bread! Thanks!
(P.S. All your quick replies to each question are really great to see. 🙂
Can’t wait to see how it comes out Kirsten! Let me know what you think…
Well, I tried it twice and neither time did the bread really rise. Second try I added more yeast, more yogurt, and added an additional hour in the IP. Bread is SUPER dense…like a brick, actually. What might I be doing wrong?
Hi Kirsten, did you use instant yeast or active dry yeast? I suspect you used the latter since the gluten in the bread never activated
I used Fleischmann’s rapid rise instant yeast fast-acting.
That’s the correct yeast, the one that does not need activation. Did you check the expiration date on the yeast?
I’m having the same problem. Very dense loaf. I bought new rapid rise yeast today and greek yogurt, and used bread flour. It still doesn’t rise much after 4 hours. The taste is great, but the center just doesn’t cook all the way.
Are you using the yogurt button on the IP?
It may be that you are using the yogurt button but not the yogurt “low” button. So the yeast probably dies.
Thanks, Tiffany, for this fabulous sourdough bread recipe! Followed it exactly except for adding 1/4 cup more yogurt than what the recipe called for so I could form into a ball. I LOVE how hands-off this recipe is, since I usually make homemade bread for holidays or occasions when I’m doing a lot of other cooking. The taste was terrific! This recipe is a keeper.
Yay! Glad you liked it TK! Now you don’t need a special occasion to make bake bread at home
I have both Active Dry Yeast and Fast Rising Yeast (Highly Active)..it’s from Baker’s Corner, which one do I use?
fast rising yeast Adriana, my guess that would equal instant yeast
Would I be able to split this dough in half to make two loaves, instead of doing a ball?
Yes Amie, you can, as long as they fit in your dutch pan
Have you used Einkorn flour with this recipe?
I have not Kim.
Looks, Cool, I’d like to try it I tried to read thru the comments to answer my questions but got lazy.. here it goes
What exactly does the “yogurt” button do? Like what cooking method are we replicating by using the Instant Pot for the bread?
And lastly in your photo it looks like the bread isn’t touching (or even near touching) the sides of the dutch oven, is this important? or will a little contact be ok?
Hi Logan, to answer your questions:
1) The yogurt button cooks very low and slow. Use an oven to proof overnight if your IP button does not have one (or simply turn your oven to 200 F and proof for 4-5 hours)
2) My dutch oven is not round, it’s elongated that’s why it’s not touching. And a little contact is perfectly fine
This looks amazing! I do have a few questions regarding my Dutch Oven. It is an enameled cast iron; size 5.5qt. I read my manual and it says oven safe up to 400F. Also, the enamel surface is not suitable for dry cooking. Add a liquid, butter or oil to the bottom of the cookware prior to heating.
Will this be big enough for the loaf? To preheat my dutch overn, will adding avocado oil to bottom be all right? Or should I just purchase a cast iron dutch oven wtihout enameled? 😉 Thank you!
Hi Ellen! A 5.5 would be just fine! and no, it wouldn’t stick if your pan is enameled because the temperature is so high.
Can you use a Corning Ware dish?
I wouldn’t since corning ware cannot be heated to that temp, plus it won’t give you the crust you’re looking for
Tiffany, do you leave the bread in the Dutch oven while it cools? Otherwise, how do you get the hot bread out of a hot Dutch oven? Thank you!
I remove it as soon as it comes out of the oven, carefully and let it cool on a rack. Bread should not stick since the temp is so hot
Thank you for the recipe. The dough came together quickly and did taste like sourdough. My texture was a little close. The first proofing went long and perhaps that’s why. I will try it again. Also took a portion of the dough, added minced garlic and Italian spices and made breadsticks. Turned out great.
Thanks for your feedback Nancy! I like your breadstick idea! will definitely try it next time!
Usually, making bread involves some type of sugar but this recipe has none. Can I mix up the batter using a bread hook on my mixer?
Hi Alice, since the recipe calls for Yogurt, the milk naturally contains sugars so there’s no need to add more. And also, this is a no-knead recipe (that’s why it uses so much hydration and little yeast) so don’t use the mixer, you’ll see how easily the dough ball comes together.
Let me know how it comes out
I have the instant pot mini 3 qt. Do you think this recipe would be too big for it? Could I maybe half it and make a small loaf of bread?
Hi Lisa, yes, definitely half the recipe.
Can I make this bread in my bread maker, mixing, proofing and baking?
The bake won’t give you that crust you are looking for. As for the kneading part, this recipe does not require much of it.
Hi Tiffany,
How long do you leave it to rise on counter on second proofing? Also, I read online that you can use the Warm button to proof dough if you don’t have Yogurt button. Any comment on that? I’m proofing right now….so, sort of needing to know soon. lol
Thx
Debbie
Hi Debbie, the warm button may work, although I’ve never tried it. On the counter 18-24 hours. On a 180 F oven 4 hours. Hope those help
I KILLED MY YEAST! YIKES!!! My bread failed.!…and it sort of cooked the bottom a bit, even sitting on a trivet. Well the WARM function on my Instant Pot did not work for proofing my dough. It was too hot. I checked out online what temperature the WARM function goes to and it’s 145–172°F . Apparently, yeast dies at 140 degrees Fahrenheit, although the dying process starts at about 120 degrees.. If I had the Yogurt function, it would proof dough at range of 110°F to 115°F. So, lesson learned.
I did read online someone did use the Warm function without the lid on to make their yogurt. It stayed around 100-102 F….with no cloth cover as it would get too hot. So, next time I will try that., but not sure it would proof in four hours. Will let you know.
Thx
oH no Debbie!! 🙁 I am so sorry it didn’t work out! Now we know WARM does NOT WORK for proofing! – Use the oven or counter next time so you don’t waste delicious bread!
Hi Tiffany, I’m wondering if it is 3/4 of a teaspoon of yeast or 3 or 4 teaspoons of yeast. Thank you!
it’s 3/4 teaspoon Jessica. Less yeast content + long proofing time = crusty beautiful flavorful bread 🙂
I have a 3-3/4 qt le creuset cast iron dutch oven with a lid. Is this too small to use?
Yes Sophia, I would halve the recipe
I am eating a piece of the sourdough bread right now! Very tasty! It is gummy though. Has anyone had this problem? It was proofed on the yogurt setting, then baked in a cast iron Dutch oven.
Gummy? I think it may have been undercooked when you took it out of the oven (must sound hollow when you touch the bottom) – or you may have cut it when it was too hot
Hi-
Just wondering if I was going to try adding dry fruit/nuts/seeds etc at what point should I do this? As in at the beginning with the rest of the ingredients or at the counter top proofing stage?
Also how much is good to add in ratio wise (1/4 cup? 1/2 cup?)
Thanks for your help!
Hi Sophie, you can add those after mixing the dough before putting it in the IP. Don’t add more than 1/2 cup in total because the weight may delay the growth of yeast
What about using almond flour instead of regular flour?? Thanks!
It wouldn’t work Emily. This recipe requires the development of gluten and almond flour doesn’t have any
Sorry I forgot to add…
If I want to double the recipe do I double to proof and cook time too?
Apologies if these are super novice questions! I’ve never baked before 🙂
Thank you!
For doubling the recipe only double the cooking time not the proofing time… But check while it’s baking just in case
Sourdough is usually made from a sour dough starter for someone who cant eat yeast. This recipe uses yeast which is not preferred by those who have yeast issues. Do you have an alternative?
Also – for those worrying about sticking, sprinkling some semolina under the dough will prevent sticking – it’s also good for wetter doughs, pizza etc.
Hi Trudy, you are correct, this is a “quick” version of a sourdough without the need for a starter. Unfortunately, the only alternative is an active sourdough starter. A local bakery can supply some.
Also, if using a dutch pan your dough should not stick, but you can certainly use a semolina or even parchment paper on the bottom
Hi, my Instant Pot directions say to press ‘keep warm’ to make yogurt as it does not have a yogurt button, so that is what I used to proof my bread but after 4 hours when I took it out of my IP the bottom of the dough was already a bit crusty!?
Oh no! Jacqueline the IP has a yogurt button, maybe you have a different model. The warm function is way hotter than the yogurt setting, and it may have cooked your dough 🙁
When I pushed the yogurt button, my IP went to boil before it switched over to yogurt several minutes later and my dough also was already partially cooked on the bottom when I took it out. This is my second try. That did not happen the first time. I did not use a trivet. Don’t know what I did differently.
I’ve never had that happen Ninfa. So strange.
Ninja, my IP also went to boil with the yogurt function. Something in the instruction book abt needing to repasturize the milk to make yogurt. So instead, we used the sous vida function and set the temp for abt 100F. I hope this idea is of any help.
This is artisan bread not sourdough. Sourdough bread is made with a sourdough starter and does not contain commercial yeast. My sourdough breads take 2-3 days to make.
Hi Laurie, I guess you didn’t read the blog post. Using yogurt instead of a sourdough starter is an easy quick way to achieve that tangy flavor without having to feed a starter.
I did read the post. You can’t call this sourdough when you don’t use a sourdough starter. You could say it is sourdough flavored bread, but it isn’t sourdough.
I am a sourdough baker. I own a bakery that specializes in sourdough breads.
Thanks for your comment Laurie. Where do you have your bakery? I would love to try your breads
I’m in Texas, north of Dallas.
Good to know! I will definitely stop by next time I visit the area
I have to agree with Laurie….this is nothing like sourdough – it may be a ‘sour’dough or a yoghurt dough, but no way is it sourdough.
Hi Tiffinay,
I don’t have yogurt setting on my IP and my oven does not go below 170f but I saw one place it said 100f for in the oven and another it said 180f did I missunderstand those answers, so excited to try this bread!
Thanks,
Sherryl
Hi Sheryl! no worries, if it goes below 200 it won’t cook your bread (180 is fine). Otherwise leave it in a cabinet overnight
I made this today. It was delicious and had a nice texture, although it doesn’t taste like San Francisco sourdough. I used regular active dry yeast dissolved in a few Tbs of warm water, 2 c white while wheat flour, 1/2 c gluten, and 1/2 c white flour. Also homemade yogurt that wasn’t strained as much as commercial Greek yogurt. The Dutch oven trick is genius – covered followed by uncovered makes a nice crust. Thanks for the recipe!
You’re welcome snic! Glad you liked it. For getting San Francisco sourdough flavor it would take a few weeks to create a and maintain a starter, I will do a post in a few weeks to show to process.
Can you double the recipe? If so, does the cooking time remain the same. We go thru this too fast. Extremely delicious bread!!!!
Hi Kate! you can, but you will need 2 dutch ovens to bake the bread if you decide to divide the dough in 2. Or if you want to bake a huge bread loaf make sure you have a big dutch oven to fit it. The baking time will increase as well
I do not have a dutch oven, but I have a cast iron skillet…..but it does not have a lid, would this somehow work??
Yes Rebekah it would. Do you have a lid that can fit your cast iron pan and can go up to 500 F? The steam that creates de lid and the pot is what creates that beautiful crust
Just made this this afternoon. Turned out wonderful. Baked on my baking stone with a stainless steel bowl as a lid over it. Worked perfectly. Thank you for the recipe. We have a new favorite. So easy to make.
Thanks for your feedback Pat! So happy you enjoyed the recipe. Using the baking stone and lid the perfect alternative to a dutch oven
Genius! I was reading comments to find alternative to Dutch oven and I have a stoneware piepan and stainless steel mixing bowl that fit together perfectly. Thabk youd
Glad it worked for you Melissa! Thanks for sharing!
I used 1 1/4 cups of yoghurt, 1/4 cup of lukewarm water, and 1tsp of active dry yeast. It turned out 🙂
Thanks for the measurements Ina!
Quick question I’m trying to eat Clean and wonder if you thought this recipe would work with Whole Wheat flour. I’m anxious to try it. I make yogurt all the time in my IP.
Yes it would! Just remember that WWF need a bit more of water than bread flour. Add about 1-2 tablespoons of water and follow the recipe and method
I don’t have a Dutch oven, I have a Turkey roasting pan. The old fashioned type, black enameled, large and oval with matching lid. Do you think that would work?
Yes it would Arhena, just make sure it can go up to 475 F
Can you use 100% whole wheat flour in this recipe?
Yes Ilene, just make sure to add a tad more yogurt in your recipe since WWF absorbs more liquid than regular flour.
Hello! Thanks for the recipe. I made it yesterday and it’s awesome. I have a quick question. After removing the dough from the pot, how long should I knead it before letting it rest? I’m not sure I did it long enough yesterday and I want to make sure before I make it again for Thanksgiving dinner. Thank you!
Hi Nat! glad you liked the recipe.
Since this recipe does not have a huge amount of yeast and more hydration. The longer proofing period makes it soft and does not need kneading. Basically, when you take it out of the pot simply shape it and place it on the banneton.
Thank you so much for this recipe! I have never been a good baker and have always wanted to make bread. This was SO easy and turned out so delicious, I couldn’t believe it. I only had active yeast so I activated it in about 1 TBSP water and a pinch of sugat before adding it to the mixture. Will definitely be making this again!
Thanks for your feedback Amanda! So glad you liked the recipe. Now that you’ve mastered this recipe, you can add some more things to your bread: raisins, olives, soaked sesame seeds, etc
Can you proof active dry yeast with some of the greek yogurt (slightly warmed)? If so, would you think 1/4 cup for 5 minutes is sufficient?
It is better to proof it with water or milk Susan. Use about 2 tb of warm water to activate it and then add it to the rest of the recipe. You may need to reduce the amount of yogurt by 2 tb
I have a batch of this bread proofing now (can’t wait to see how this turns out) but in reading comments I see one about sourdough starter. I have sourdough starter I would like to use. Can I ? What changes to the recipes would you recommend?
Leslie, just replace the amount of yogurt with the sourdough starter 🙂
Thanks. Now I wondering if I would I still use the yeast?
Yes! use half if you want to, but still, use yeast. Some bakers love combining the 2 (starter and yeast) – otherwise the proofing would take much longer
Could I make this in a glass ovensafe dish that has a lid? I don’t have a dutch oven. 🙁
You may Christina, but the results won’t be the same. Do you have a seasoned cast iron skillet? You can use that and an upside-down bowl to bake your bread
I used Einkorn Flour and it did not rise in the instant pot?
Hi AIMEE, I have not tried the recipe with Einkorn Flour, it’s very different than bread flour and that’s why your dough may have not risen. Try using a bit less yogurt (liquid) and use the same amount of flour
I just made this in my 6Qt. Duo. My husband is going nuts over it. It came out perfect! Thanks so much for the recipe. I will be making it often.
Thank you for your feedback Janet! Glad your husband loved it. Have a great weekend.
I made your sourdough bread this week. the finished loaf was impressive and had a wonderful crumb. I was a little disappointed in the flavor as I was expecting a more sour flavor and have a few questions. I purchased Chobani Greek whole milk yogurt and it was super thick. The ingredients were very difficult for me to combine even after your suggested additional tablespoon or two of yogurt. I finally added a bit of milk, dove in with two hands and mixed as well as I could. The rest of the recipe was easy to follow, kneading no problem and as I said the results were impressive. The sour taste was not equally distributed throughout the loaf. Could sour cream be added and would that add more of a sour flavor? Would appreciate suggestions for my next sourdough adventure. Thanks.
Definitely, Cheryl, sour cream can be used in place of the yogurt
I don’t have an actual Dutch Oven . Would a regular pot with a lid work? Should I grease the bottom or spray it?
If your pot can withstand that temperature then yes. Grease the regular pot with spray. A dutch oven does not need to be greased
Made this last night and although it didn’t rise quite as much as I expected, it was delicious and our friends whose home we took it to RAVED about it. I’m trying it again today and I have two questions.
1) If I want to add garlic and herbs, do I knead them in after the proof in the IP? I was going to put them in before the proof but I was afraid of messing up the activation of the yeast. Is one way preferable to the other?
2) How important is the timing? Could I have taken the dough out of the IP and transported it to our friends’ house in a stainless steel bowl covered with a cup towel and baked it there in, say, a couple of hours instead of right after the 30-minute preheat?
Thanks for a great recipe!
Hi Melissa! on your question 1, the answer is yes! Add them before proofing. On question 2: timing is important but it does not have to be exact. This bread actually requires a long proof (overnight) – the IP speeds it up, but you don’t really have to be exact. If for instance, you need to finish proofing at your friend’s house that’s fine. Adjust it to your needs/timing
Thank you! About to make some now with garlic, parmesan, and some Italian herbs!
yummm that sounds fantastic!!!!
Hi Tiffany,
You said you can use a cast iron skillet. Do you need to heat up as you do with the Dutch oven? Also, does it need to be covered as well?
Yes Sandra! Use a stainless steel bowl turned upside down as the lid
I made this recipe yesterday, it was dangerously delicious! I loved the crust and dense texture of the finished piece.
I think I will use the recipe to make cinnamon rolls with cream cheese icing. I’ve never made herbed bread, but will try that also. I think the options may be endless.
Baking in the Dutch oven was a new twist for me. I had a Dutch Oven, but I don’t recall ever using it. I’ll incorporate it into my culinary expiraments in the future.
Glad you liked it Helen! Baking in a dutch oven is definitely a game changer. The way it traps moisture and steam to create this crispy chewy crust is amazing! try also the pesto bread (my fave) —> https://livingsweetmoments.com/no-knead-pesto-bread/
Cumbersome and confusing. Just make 18 hour no knead bread. The best flavor , easy steps. Flour , yeast, salt, water. Use cast iron enameled dutch oven I.e. LeCreuset, Martha Stewart, Rachel Ray. Staub , recipe out there everywhere Make dough , set on counter, cover with plastic wrap and towel overnight and bake bread the next day.
What part is confusing?
This recipe differs from the “no knead bread” because the yogurt gives it a beautiful acidic flavor that mimics a sourdough starter. The 18 year fermentation can be caught short by using the IP
Hey Tiffany,
Could I make a bunch of dough balls and freeze them separately so I can just pop it in the oven for the last step of 10 mins?
Thanks for the recipe -love I can make my own sour dough!
David
Hi David! You may! Just defrost the night before in the fridge
I make my own kefir. Could that be used in place of the yogurt?
yes Deb
I have an Instant Pot multi cooker – the Aura Pro — will this recipe work for this pot?
Hi Mary! Yes, use the yogurt button on your Aura!
How is this a sour dough bread with yeast? I don’t see any fermenting like is required with a true sour dough. And my understanding is a true sour dough will not contain yeast as an additive since natural yeast occurs while fermenting. Please explain.
Could wax paper be used instead of parchment paper for proofing?
yes! remember to remove it before baking since wax paper cannot tolerate heat
My bread is coming out very dense. It has a great flavor, but by the 2nd day it is to tough to eat. I bought new yeast and yogurt and use bread flour. something is not right with this recipe. I have never had trouble making bread before.
I followed your recipe and did have to use more yogurt. The dough seemed to have proofed nicely in the IP, then I shaped it, covered with towel and let it rest while the dutch oven was heating in the oven. After the 30 min. I took off the lid to brown bread more and after taking the bread out of dutch oven, the bottom of the bread was almost too brown. Dough was still somewhat dense. I did use bread flour and instant yeast. Should I let it proof longer in the IP or on counter after the 4 hours?
I am guessing it needed a bit more baking in the oven since the center was dense. Also, did you allow it to cool down for a good 20-25 minutes before cutting? Sometimes they finish cooking outside the oven
New at this, so do I proof in the oven with lid on or off??
cover with a clean towel
I have tried this three times and have not had luck with it yet. I’m not a quitter tho. Lol
I have read in this blog that I can prove in the oven as long as it is under 200? Tried this and didn’t work. I have a cast iron kettle that I’m using and I used the lid. It was dense and the outside was almost crusty. I bought bread flour(White Lily) and new instant yeast. I’ve used both yogurt and sour cream. My oven goes down to 170, is that a ok temp? Help! I really want to make this bread. Oh, and I also activated the yeast with one batch and the outside was a little hard and the inside of the ball was moist. Turned out dense again.
Dana, did you overwork the dough? Maybe over-kneaded it?
I don’t think so. I have had to add more sour cream and yogurt to get the ball shape . Is the oven temp of 170 ok?
Yes Dana! It is. You can also leave it covered inside a cupboard overnight
Thanks for sharing such a great recipe. My family and I just devoured most of the bread made from your recipe. This is the easiest bread recipe I’ve tried with great fluffy bread as a result.
Thanks Kristin! Glad you and your family liked it! Have a great weekend
If you time it right,, can you have the dutch oven heated up and ready to go right as you take the dough out of the instant pot and shape it? Or does it need a counter rest in addition to the proofing in the IP? Just trying to cut down on the time a bit.
Hi Jason, when you shape it – it is important to leave it 30 minutes to rest before baking. During that 30 minutes I recommend preheating the dutch oven. After the half an hour has passed you quickly take out the DP out of the oven, add the dough, score it on top, cover and bake.
I make this tonight and results were okay. The dough was too dry, with flour that simply wouldn’t incorporate. Added another tablespoon of yogurt and it came together, though the dough was a bit sticky. After the 4 hours in the IP, the dough had spread side-to-side but not up a whole lot. And whoo boy did it stick to the parchment (as other have noted). Really wonder if the recipe shouldn’t say to spray it first.. I pried as much as I could off. Though ball wasn’t anywhere near doubled in size.
I put it on the counter after a little kneading and stuck a bowl over it while the dutch oven was heating. Should have put it in a bowl with towel, as it had a bit of moisture on it after that. It did rise up a bit more, though. Put it in the oven and it cooked well, with nice browning and crush. Very little cracking as shown in the photo. Knocking on the bottom gave a hollow sound. It was not that big of a loaf and a little dense. But better than most of my attempts in the past! Let it rest for half an hour. Was still a tiny big gummy/moist in the center. But it was very decent with butter.
Used King Arthur bread flower and Red Star instant yeast. Both newly purchased yesterday. And used yogurt made from your recipe. So all the ingredients should have been there.
Feel like maybe you should list weights on your ingredients. People’s measuring cups can be over/under by quite a bit. If you’re giving a recipe like this, you want to make sure we’re all doing it right.
Thanks for posting it. Definitely going to try to improve. And thanks for the easy yogurt recipe! Was a hit with my daughter.
Thanks for your feedback Jason.
Hello, where I’m from we don’t know what a Dutch oven is? is that an ordinary fan oven? probably not! also I’ve got a KP machine where there ism’t a setting for Yoghurt. Would you know what setting I should use please? possibly a meat setting without the pressure?
Hi!
1) Dutch Oven is a cast heavy iron pot with a lid – you may use cast iron if you’d like
2) If your ip doesn’t have the yogurt setting, simple proof covered in a low oven (180 F) for 4 hours or place dough in a covered bowl and leave overnight inside a cupboard
Hey do you have a recipe if you don’t have an instant pot?
Of course Susan! Use the ingredients in this recipe – and follow the instructions on this blog post: https://livingsweetmoments.com/no-knead-crusty-bread-4-ingredients/
Hi. What a great looking loaf of bread! As a diabetic sour d0ugh bread is one of the lowest in carbs of most bread. I have no dutch oven. Besides buying one is there anything else I can do? Slow cooker?
thanks
Hi Don, a slow cooker will give you a soft crust (like bread rolls) – do you have a cast iron pan?
Hi Tiffany, the recipe looks great. I don’t have a dutch oven but I do have cast iron pans? how ca i use it rather than the Dutch Oven?
You can use the pre-heated cast iron pan, use a stainless steel bowl to cover your bread
What is the best method of making dough ahead of time and baking when you’re ready to have fresh bread? I run a charter boat and would love to make individual bread bowls for my broccoli cheese soup. Can I just proof ahead of time, shape into smaller portions and refrigerate or freeze??
Hi Holly. I don’t recommend freezing the dough. You may, however proof them in the fridge for a couple of days before baking or follow the recipe instructions and bake.
When they bread has baked and cooled FREEZE (after wrapping them with foil and plastic wrap). To defrost, leave them overnight in the counter and bake them at 400 F for about 10 minutes to restore their delicious crusty crust
This is the easiest and tastiest sourdough bread recipe. I made this today and I am trying very hard not to devour the entire loaf. Just delicious. I had been intimated to try sourdough bread but this recipe was so simple and using the instant pot was great.
Thanks for your feedback Kim! so glad you liked it. I have devoured a few loaves myself 🙂
Hi Tiffany! thank you for answering my question on instagram. I asked about using a sourdough starter I have in the fridge which you said , yes, just replace the yogurt with the sourdough – But, do I still add the yeast? thank you so much for your patience !
yes, add the yeast because if you leave it out it would take approximately 12 hours to proof with just the starter
Hi Tiffany!
Could you let me know how I’d make it with Sourdough culture and no yeast. Is it just 12 hours instead of 4 in the IP.
Thanks so much for this recipe! Made it twice as written and it was easy and delish!
Hi Tiffany, after proofing 4hrs in IP, the dough was very moist and difficult to roll into a ball. I have added some bread flour and knead lightly again but still very moist and dough was sticking all over my fingers. How can I remedied this situation and any idea why this happen? Isit too much yogurt?
Thank you!
Hi Apple, the ball should have been manageable before proofing. After is just placing into the baking vessel. Did you knead before proofing?
I do not have a Dutch pot or another pot with a lid that can go in the oven… can I use a stock por and cover it with foil?
Yes Alina, but you may not get the crunchy crust. Another method is just using your pan without lid and in the bottom rack add a pan with steaming water.
This recipe was simple and fabulous! I used yogurt Irhat i made in my new IP. Thanks so much. This is sure to be a staple in my home!
Hi Kathy! glad you liked it! Thanks for your feedback
I was curious about how to bake this in high altitudes. Usually there is additional flour added, but if so how much? I’m at 5500 feet. Thanks in advance! Can’t wait to try it!
Hi Rosa, unfortunately I do not know the conversion to high altitud baking. But I do know you will need more yogurt and bake it at 475 instead of 450 degrees f
Looks amazing!
Wonder why this is called sourdough, when there is no sourdough In it. Could I replace the yogurt with sourdough starter?
Thanks
Yes you can Gina!
I had the same problems with the amount of yogurt. I put about 2 cups in and I am still worried it was too dry. Hoping that it turns out! I love sourdough!
Some flours absorb more liquid than others. Depends on the brand. Let me know how it turned out
I tried this last weekend and it was almost like the Instant Pot was too hot, I had it on the yogurt setting but the bottom of my dough was so hot it started to “cook”. I’m wondering if anyone else had the issue?
I did’nt understand the response to the question of “no yogurt button ” on the IP. I like the idea of a 4 hr process in the IP instead of 12 hrs on the counter top . If there’s no yogurt button on the IP ,what would be best ?
Hi Mike, if there’s not yogurt button on your IP, Proof in a low oven (170-180 F) for 4 hours
Tiffany, thanks! Very tasty bread turned out. Very cool photos!
Glad you liked Alyssa!
I did this yesterday and must say it’s a revelation… I am now thinking of how much money we’ll save as a loaf where I live (North London, UK) costs GBP 3.50-5! Thank you for the recipe, I’ve shared it with a few people now too.
Glad you liked the recipe Jade! I’m in London right now and loving your city 🙂
Can we use steel bowl instead of parchment paper
The steel bowl may not carry the heat needed to proof the bread. It may take a bit longer or heat your bowl slightly
I only have active yeast rather than instant yeast. Since active yeast needs to be dissolved in water before mixing into the dough, will the bread still turn out good even if I add the yeast water to it?
Yes Emily. Simply reduce the amount of yogurt in the recipe (depending on how much water you add at the beginning)
I know this may sound silly. But is there a way to cook the bread in the instant pot too? Like instead of baking it in the over. IF not what are alternatives to a dutch over pot, I do not own one.
Hi Candance! It’s not silly at all! I tried it (before posting) and unfortunately, there was no color, no crust, and really gummy texture. So it doesn’t work.
If you don’t own a dutch oven use a preheated regular baking pan or a cast iron pan
I’m not sure i’m following, are you proofing the bread for 4 hours?
Correct Kevin, instead of overnight.
Can you use dairy free yogurt?
yes!
The actual recipe for this bread is missing from the site. Can you repost it?
Hi, the problem has been resolved. Sorry for the inconvenience. You should be able to the recipe now.
Hi! Would it be possible to proof the dough longer than 4 hours? Wondering if I could leave the dough in the IP overnight so I can bake it first thing in the morning for breakfast.
For example: Could I proof it for 8 hours with the Yoghurt function in the IP, and if so how would it affect the bread?
Or should I proof it with the Yoghurt function for 4 hours and then let it sit in the IP for another 4 hours (no Yoghurt function)?
Yes you can Thank Tessa. But don’t leave it in the IP overnight. Leave it inside a cupboard or covered in the counter
Do you use yogurt less of normal setting for proofing? Thank you for the recipe.
for proofing!
Tiffany – Could I make sourdough muffins with this recipe? My husband is on a specific nutritional plan calling for sourdough muffins…Thanks for the recipe!!
Hi Carol, unfortunately no. The texture would be all wrong for muffins.
I didn’t use a dutch oven. I kept the risen dough in the Instant Pot (on parchment paper) and found an oven-safe lid for the inner Instant Pot. I simply transfered it to the over. Easy peasy!
Oh wow! how ingenious! never thought of putting the instant pot bowl in the oven. Thanks for the tip and the feedback!
I only have a cast iron Dutch oven , will this work ?
Yes! that’s perfect Rochelle
Hi! I couldn’t find it anywhere on here; so you close the valve on the instant pot to seal while it proofs (not venting)?
It does not need to be sealed. Just closed
Hi there – it looks like the recipe has disappeared again?
Hi Whit! the recipe should be there. Just hit refresh
Can you adapt for rye?
Hi Sue, Rye requires different hydration so I don’t know if the recipe would work
Oh my goodness, FINALLY, a wonderful Instant Pot bread recipe that works, So pleased with the beautiful loaf. I wonder if anyone has experience with this recipe using gluten free flour? THANK YOU.
Hello all, and Happy New Year!
Would the following be appropriate for the baking stage of this wonderful recipe?:
https://www.amazon.ca/gp/product/B00TWXR4SW/ref=ox_sc_saved_title_1?smid=A3DWYIK6Y9EEQB&psc=1
My oven is a smaller countertop convection oven with limited space.
Thanks in advance, blessings to all.
James
That pot is quite small. I would half the recipe. Happy New Year!!
Hi Tiffany,
I’ve made this recipe twice and I can’t get the bread to rise correctly. I am definitely using instant yeast. However, my IP has a high and low yogurt setting. It defaults to high. Should I be using low? The dough does come out of the IP with a light brown crust and dry shell.
Hi Tiana, definitely yes. Use low setting since your dough is technically cooking using the high setting. Also, check the expiration date of your yeast.
My IP doesn’t have a yoghurt option. I have read all of the comments about proofing it in the oven, I don’t want to tie up my oven for that long. Can I use the “keep warm” function on my IP? The manual states that “keep warm” is between 145F-172F, which is probably about how low my oven goes any way. I infuse my own oils and I bet a home made, warm crusty, sour dough bread would just make it over the top!
Hi Gina! unfortunately, no. They keep warm function will actually cook your dough. Leave it inside a cabinet, or a cupboard for 12 hours covered.
Hello
I would like to know if I can use whole wheat flour instead Bread flour? Do you think I will get the same results or should I add something else? I’m trying to avoid white flour
yes, but you will need to add more yogurt or water
Why arent you using a sour dough starter. Vs plain yeast. Without that, its not really sourdoughs
Read the post 🙂
HI! Can you tell me if you’ve COOKED your sourdough (or any breads) IN your IP? If so, how?
Hi Lori. For bread, I do not recommend ‘baking’ it in the IP. I have tried and the texture is somewhat rubbery
Hi Tiffany, this is my 1st recipe I am making from your lovely site! Also 1st bread making other than with a bread machine. Dough is proofing in IP right now! Having it with slow cooker Cheesy Tortellini, Chicken and Spinach soup while we watch the Superbowl. I have a few questions though. My dough needed a bit more than 2T of extra yogurt. I noted that my Cabots Greek yogurt was super thick. When I turned on my IP yogurt setting it said 8 hrs on the timer though. I have the IP DUO Plus. I just hit the minus sign to reduce time to 4 hours but just wanted to double check this was correct? Alternatively, I am wondering if the dough could be prepped in a bread machine on dough cycle for those that don’t have an IP? Or would that overmix the dough? I will be baking this bread in a vintage Schlemmertopf clay baker I found in a thrift store. So excited to see how it turns out!!!
Hi Heather! yes, on your first question. Move it to 4 hours.
The dough doesn’t need to be kneaded perse. Just to come together into a ball so you don’t need to pull out your breadmaker for that.
Let me know how it comes out!
Shouldn’t have cooked those last 8 min – was golden brown at 25, but otherwise quite tasty
Glad you liked it Barb. Each oven is different and baking times may vary
Thank you for this recipe. I have tried it 4 times now, the favour is great but I do not like the texture, it is more like a dense stale bagel!! I was hoping for a lighter texture. Am I doing something wrong or is that the expected result? I have tried different yeasts, added more yogurt (more than you recommend ) but it is still too dense for my liking. Also, I like the crusty top but the bottom os always burnt even though my oven is slow. I have used a thermometer to check the doneness and have had to bake it up to 10 minutes longer to reach 190 degrees. I did this because I wondered if it was not fully cooked before. I am in Canada and our flour is different, perhaps I should be using less flour?
I have followed your recipe to the letter before I tried these adjustments. Do you respond to these letters by e-mail? you are so good at answering them but there are now so many I might never be able to find your reply.
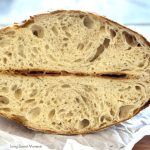
Hi Margaret. The texture of the bread shouldn’t be dense. It should have big irregular holes like the picture. Are you using bread flour (also called high gluten)? did you check the yeast expiration date?
Thanks for answering Tiffany. Hmm, I can’t think what could be wrong. I. use bread flour and the yeast is good. I should mention that it makes very good croutons though.
Do you live in a high altitude area?
I used King Arthur unbleached organic bread flour, pink salt, Active yeast (didn’t proof) and a whole milk plain organic probiotic yogurt (not Greek). I had to add 2 tbls extra and proofed it in my Cosori IP. It worked perfectly. I have an oval enameled cast iron dutch oven and it baked perfectly. I little to crusty on the bottom but that was easily cut off. It taste very good and made sandwiches with it. Then I read the recipe again and realized that I used the wrong yeast. SO… I’m trying it again with the RapidRise. I also realized after I made the first one that i didn’t get Greek yogurt but it still works great and my husband had no clue there was yogurt in it. (He hates yogurt.) Love this recipe and how easy it is to make. This will be our bread from now on. Want to try olives and spices soon. I do have one question tho… Does the yogurt need to be at room temp? I didn’t do that but was wondering if that will help in the proofing…
yes! Julie the active dry needs to be activated with warm water…And about the yogurt. Not necessarily, but it helps
Can I not use active yeast if used correctly?
You would need to activate the yeast with warm water. If you do, decrease the amount of yogurt in the recipe. That would result in a less tangy bread
Hi, I would like to use my kitchenaid mixer. How long do I knead for? I dont want to overmix….thank you!
Hi Caroline, this recipe hardly requires kneading. A few turns on your counter and that’s it.
I don’t have a dutch oven but I do have cast iron frying pans, 10 and 12 inches. Instead of a lid could I use foil to cover the bread while baking? And which size pan would work best?
Yes! use the 10 inch
So in reading, it’s best not to use regular unbleached flour? Was wondering also if sour cream can be substituted for the greek yogurt? These are all I have right now and trying to stay away from stores as much as possible. Thanks in advance!
You can use both Theresa. We adapt to new situations 🙂
Thanks very much for the recipe. You don’t mention in the recipe itself which level of Yogurt setting you use for proofing the dough, however in reading through the comments you mention you use the ‘Low’ Yogurt setting. It would be helpful to have this information in the recipe. I am 1.5 hours into proofing my dough on the ‘Normal’ Yogurt setting & had to reset to the low setting. Hopefully the dough will turn out ok!
hI Natasha. Use the low setting for making yogurt
Love this bread. I used bread flour, 0% Greek yogourt, and because I’m a dumbass, active yeast that I did not activate first… my bread came out incredible!! The flavour and consistency is amazing. I’m going to make another loaf tomorrow because I guarantee that when my husband gets his hands on this, he’ll finish it off tonight!
Notes: I had to use a fair bit of additional yogourt. I’ll definitely activate my yeast next time, or use instant. I baked it in a Dutch oven which I think is a must for excellent crust.
Wow! I am impressed that the bread rose without activating the yeast! that’s great Jen! thanks for your feedback!
I’ve made this twice now. The parchment paper winds up sticking to the dough. Do you have a better way to do this so it’s not so messy?
Love the bread.
Yes! just flour the parchment paper. Your dough may have needed a bit more flour since it’s not supposed to be that sticky
I made this bread with regular, unbleached flour, sour cream and active yeast, only because this was what I had on hand. I activated a tiny bit more yeast than what was called for in warm water, then added slightly less sour cream. The bread was FANTASTIC!! Not only was it gorgeous to look at, the flavour and texture of both the bread and the crust was perfect!! Thank you so much for such an easy and wonderful recipe!
You’re welcome Tania! glad it worked out for you!
Hello, I’d love to make this but I don’t have an instant pot. Would it be ok to put the dough in a bowl and cover with a tea towel for 4 hour?
Yes proof it in an oven (turned off) for 12 hours
I just want to thank you for this recipe! I followed the instructions exactly as written and baked a beautiful and delicious loaf of “sourdough” bread. My kids loved it so much it only lasted a few days, so today I am making it again! :). I hope I have the same results as my first loaf!
Hi Wendy! so glad you and your kids enjoyed it! it’s a great and easy alternative to a starter. Happy Friday!
Hi I tried this recipe but after I put the dough in the instant pot and used the yogurt function the boil indicator came on but it never started the timer it just beeped and said yogurt, did I screw up? is the dough ruined?
No, I don’t think it’s ruined since the yogurt works on very low temperature
H, I didn’t see the note about not using an electric mixer to knead the dough and the only way I could get the ball to stay together was to beat it with the paddle on my mixer until it all started to cling together… Have I just ruined my bread? It in the instant pot now, is that going to prevent it from rising?
No, Ashley you did not ruin it. No worries, it’s going to be fine.
Hello,
Is regular yogurt acceptable or does it have to be Greek yogurt?
Regular yogurt is acceptable
thank you so much for your prompt reply. made it tonight and it was delicious accompaniment to our Easter dinner
Hi, I tried your recipe and my it did not rise. . I am using instant yeast. I did not double in size after proofing in my IP for 4 hours. what did I do wrong?
Was the yogurt button on and the lid closed? If yes to both, then your dough may need more time in the IP. Leave it for 1 hour longer to see if it rises
I have to admit: I used the wrong yeast, active, and it still turned out absolutely amazing. I also had to use some water as I didn’t have enough greek yogurt to make the ball. Thank you!
you’re welcome Gillian!
Hi! I only have active yeast. How would I go about doing the recipe? Thank you!!!
Hi Tabitha. In a small bowl add your active dry yeast, mix in 2-3 tablespoons of warm water (not hot, not cold). Cover with a kitchen towel and let it rest for 10-15 minutes. Proceed with the recipe
This came out delicious! Glad I used this recipe.
You’re welcome Alejaya! so glad you liked it. Thanks for the feedback
How can I use IP and also use active dry yeast. We are quarantined and can’t get out to buy different yeast.
Hi Debbie! no problem.In a small bowl add your active dry yeast, mix in 2-3 tablespoons of warm water (not hot, not cold). Cover with a kitchen towel and let it rest for 10-15 minutes. Proceed with the recipe
I am so excited to try this recipe. Can I substitute dry yeast with yeast starter? IF so, how much do you recoomend?
Hi Jen! it’s a little complicated since a sourdough starter has water and flour. So whatever starter we add, we have to subtract the flour and yogurt in the recipe.
So, 3/4 ts of instant yeast = 1/3 cup of starter. Reduce the flour to 2 3/4 cup and go from there. If the dough seems to liquid, add some more flour.
I’m wondering if you have ever done Gluten free bread in the Instant Pot?
I have tried and failed Lisa 🙁
My bread turned out great!!! I had plain yogurt so I used that and it’s so yummy!
Yay Chanda! thanks for sharing!
I don’t have yeast. What can I substitute? Will baking powder or baking soda work?
No Dana, unfortunately, there’s no substitute for yeast. Sorry. If you’re looking for no yeast bread recipes I suggest these ones: https://livingsweetmoments.com/latin-cheese-bread-almojabanas/ , https://livingsweetmoments.com/pandebono-colombian-cheese-bread/
Tiffany, my instapot does not have a yogurt setting.. how will this work?
Usually I make (true) sourdough but I’ll give the yoghurt recipe a go. I have tried it before but it was many years ago.
I don’t have a dutch oven so I use a 12″ pancake pan with the hard plastic handle removed (it unscrews). I get this hot in the oven and place the bread on it. I got rather lucky because my large stainless steel mixing bowl just happened to fit within the rim of the pancake pan! – an improvised Dutch oven. and it works extremely well, base of the bread is always cooked.
Awesome Michael! Thanks for sharing, this tip will help a lot of people who don’t have a dutch oven
Thank you so much for this recipe! I’ve been using my Instantpot to raise french bread for quite some time, but the bread grows stale so quickly and we just can’t eat it fast enough. For a change I tried this sourdough recipe last Saturday and the results were amazing. The bread was perfectly soft and chewy inside and crusty outside. It was dense like sourdough should be and tasted delicious. The amazing thing was that we finished the last of it on Thursday and it was still good! I’m making another loaf today, and will be trying your Rosemary Olive loaf next weekend. Thank you, again!
That’s great Cynthia! I am very happy you loved the recipe! thanks for your feedback!
I’m really confused by your comments stating that rapid rise and instant yeast are different.They may be but neither requires water to activate. I think you meant active dry yeast but it was odd that you said it multiple times. Seems like some people had issues with the bread not rising. Can’t the yeast potentially die off when it comes in direct contact with salt? Typically I mix part of my flour, yeast, an minimal amount of sugar followed by liquid then remaining flour and salt last. This is a huge let down that all you are doing is proofing the dough in the instant pot though. It’s quicker to just increase the yeast and let it rise on the counter. It was also another let down that it isn’t even a sourdough bread. I read your post and get what the taste you are trying to achieve but it’s a misleading recipe title. I usually don’t leave comments like this since I have no intention on trying this but it really seems misleading and the information doesn’t really seem right. Sorry
Thanks for your comment Erin.
Hi Tiffany,
My first try and the outside I think looks good but maybe I used too much yoogurt. I didn’t statt using my hands until I was up to two cups. Too bad I can’t upload pictures. The inside didn’t expand as mush as I would think I put it back in the oven to see if that would help, I guess it did. Pictures
I think its a little too moist and dense. And I don’t think enough salt. 🙂 next one will be better.
Thanks for your feedback Joan!
Could I use Keifer instead of greek yogurt?
Yes!
Yay! Would it be the same ratio with the keifer?
Keifer you mean Kefir milk right?
Nope, it’s definitely more yogurt like. I expected it to be milky, but it’s just like greek yogurt.
This looks so yummy, I can’t wait to try it out! I’ve baked breads a few times over the years, and have one question: After it is proofed either in the IP or in 100* oven, it is kneaded a little and then rests while the Dutch oven warms for 30 minutes. Is this long enough for it to rise a second time? I see other comments where the bread was dense or didn’t rise, so I wonder. Most other bread recipes I’ve tried call for 2 rises before baking? Also, should I grease the Dutch Oven before placing the dough ball in?
Thanks!
Hi Ginger! thanks for your question. Since this recipe uses instant yeast, the second proof is very little, just while the dutch oven is warming up. If you want to leave it longer that’s fine but it’s not a necessity.
I know usually bread requires to rises, but this method requires a long first proofing to minimize the need for the second one.
2) I don’t great my dutch pan and it has never stuck. You can spray some nonstick spray before sticking your bread in there just in case
Just curious if after proofing in the Instant Pot, can I place it in a proofing basket and put it in the fridge to bake the next day?
Hi, I have made this recipe twice now. Both times I followed the recipe to a T, but both times it came out beautifully crisp on the outside, but raw in the middle. Any tips on how I can get it to be baked through the middle?
Hi Claudia. Every oven is a little different. Bake with the top longer before removing lid. Try 10 minutes longer. When taking it out, turn it around and give it a knock, it should sound hollow.
My first ever attempt at making bread and it turned out awesome! I’m thrilled! Thanks for the recipe!
You’re welcome Katelyn! Glad you liked the recipe!
I’ve made it twice now. Used active dry yeast with your recommendation about that type of yeast. Last loaf was best loaf I have ever made regardless of recipe. Have pic but don’t Instagram so if you want it let me know. Thanks for great recipe.
You’re welcome Bo! Thanks for sharing your feedback!
Thank you so much Tiffany! This is my first time making bread so I followed your exact directions and the bread came out fantastic!!!! This recipe is going into my favorite recipe binder to make again!
Yay! that’s great Ruby! I am very happy you liked the recipe! Thanks for the feedback!
Hi! I was so looking forward to making this bread. I followed directions. I used active dry yeast thinking it is the same as your the yeast in the recipe. I am not an experienced baker. So , the dough is now sitting in IP for 4 hours waiting to rise. Reading all the comments( which I should have done before doing this) I realized I should have added water to the yeast first and waited 10-15 min.
Now, will my dough rise? Or do I have to start all over?
Thank you.
Hi Wendy. Sorry about that, yes you have to start again since the yeast wasn’t activated.
Wish I could post a photo of this beautiful loaf of bread. I followed the directions mostly to the “T”, with one change. After the 4 hour proofing, I placed the risen dough in the refrigerator over night for the second rise. Then in the morning, removed it from the frig and let it rest on the counter while the oven pre-heated for 30 minutes. Then baked it per recipe. The loaf came out beautiful looking and delicious tasting! This will be a repeat recipe.- thank you!
That’s awesome Maggie! thanks for sharing! I looked at the picture you emailed and that bread looked pro!
Does the yogurt need to be warm or room temperature, or is it okay to use yogurt straight from the fridge?
Honestly, I’ve done both ways and it doesn’t make a difference
My bread is slightly doughy after baking, I heat cast iron pot for 30 minutes at 450 with lid, put in bread dough and bake for 25 minutes with lid, remove lid and bake for 10 minutes without lid, when sliced the bottom half of loaf is slightly doughy. Any suggestions to take care of this problem?
Yes, Marge. It may have been that your oven needs calibration. It doesn’t heat up to that temperature. Next time, leave it to bake longer – about 10 minutes more
Thank you for this recipe! I’ve been enjoying it. I’ve found that I’m using about 2 cups of yogurt and will add a small amount of warm water to get all the flour mixed. This also seems to have helped my dough rise. I also added garlic, rosemary and thyme to the dough, which makes it amazing to just add butter on it for eating.
Now I’m playing around with this recipe with gluten free flour. I’ve only made one so far and it tasted good, it was just gummy on the inside, so I will try to bake longer the next time. I used the Red Mills gluten free, which is suppose to be the same amount as regular flour. I’ve also heard that the King Arthur’s gluten free is superior to the Red Mills in the transfer of regular flour.
Wow, Janette! thanks for the tips. It’s hard to tell when a gluten-free bread has been completely baked.
Howdy! Do you think this might work with gluten free flour and cashew milk yogurt? I would really like to try this instead of paying $30 for a loaf of sourdough bread.
I haven’t tried this recipe gluten-free Michele. If you try it please let me know
I made this yesterday and it was HEAVEN! My question is… If I want to make another batch today, but we will be away for more than 4 hours, can you leave it in the IP to proof longer? I actually have a Crockpot Express and my yogurt setting won’t go shorter than 6 hours. So it would be on the yogurt setting for 6 hours or so.
You can leave it to proof longer but it depends on how long you will be… you can also proof it inside a cabinet or an oven (if it’s turned off) for 12 hours
This is not right! You did a bait and switch title and article! This is NOT sourdough bread made in an Insta-pot. This is sourdough bread made in a Dutch oven inside an oven! O wish I could tell Google to take away my click from the search. This title tricks peopleinto clicking becausethey think they will learn how to make sourdough bread in an Instant. Then, only after reading, reading, reading, and scrolling, scrolling, scrolling, does the truth about the title come out..
Hi Amy, on the top of the post there’s a button that says “jump to recipe” and it will take you instantly to the process.
Im new to bread mzking. I dont have a dutch oven i do have the air fryervlid for the ip can use that
Hi Paul. No, an airfryer will cook the dough. You can turn on your oven to 200 for 10 minutes. Turn it off, and then proof your bread there
Sorry i meant after proofing can i bake it in the air fryer
Hi, when you say leave it in the IP until display shows 4 hours, what exactly does that mean?
I turned mine to yogurt and the standard was 12 hours, so I’ll just wait until it shows 4 hours? Which means it stays in there for a total of 8? I have it in there now. Hope you can reply back soon. Thank you!
Hi Meike, it’s 4 hours in the IP you can use the IP timer o any timer
Mine came out a bot doughy, did it need longer in the oven ? Still tasted great
Yes, it needed longer in the oven. If it came out doughy it was a tad underbaked
Hello, I tried to read all the comments but there were a lot. Can I use dairy free yogurt?
yes!
I don’t understand why so many are having issues with this recipe…. it is literally the most straight forward set of forgiving directions I’ve come across in sometime.. I’ve made this a half dozen times and so has my neighbor and the bread comes out perfect every single batch. Each step is minimal effort and then walk away. The crumb is perfect, the crust is as craggy as craggy can get and the flavor is incredibly developed from just a handful of ingredients. Just quit whining and make the bread, it doesn’t get any easier than this.
Good morning!
I’ve made your bread a couple of times & my family loves it. Making stew tonight & thought using this recipe to make rolls would be a good idea. Any suggestions? Should I let it rise in InstaPot then break into roll balls & let sit again for a bit while oven & Dutch oven heat up? Leave space between rolls or let them touch? Thoughts?
That sounds great! Separate the balls in order for each of them to become crusty
FYI… just wanted to let you know that I tried those rolls. Came out awesome. I used a large clay roaster that has a cover so I could put the rolls in & give them a little room in-between. Came out very nice. Wish I could include a pic.
Awesome Kathy! thanks for the update! How long did they need in the oven?
If my instant pot doesn’t have the yogurt function, can I use a different function to make it work? I have sous vide, steam, saute, slow cook, bake, etc.
Also, does this bread have the same nutritious values as a regular sourdough bread made with a sourdough starter? Will I be missing out on fibers or prebiotics?
Thank you so much!
Unfortunately, no because those temperatures are higher. I recommend then proofing in a warm area (oven at 100 degrees)
Hello, if I want to do the IP process at night and then bake in the morning.
How can I store the dough after the four hours since it has yogurt in it. In fridge or on counter covered with towel. Thanks
It’s fine on the counter. The fridge will slow the proofing
Can I mix this in my Kitchenaid Stand Mixer with the dough hook until it forms a ball?
Yes you can
How is this sourdough when your not using a starter? I’m learning so bare with me
Hi Cheryl! It’s a mock sourdough! the quicker version mimicking a nice sour flavor without using a starter
Was looking for a recipe that used Instant Pot as an assist. While there is no starter in this recipe, the flavor of sourdough is there. For baking bread without a bread machine, this worked perfectly. Will definitely try again in near future.
Thanks for your feedback Amado!
Why are you MISLEADING people into thinking this is sourdough bread made in Instant Pot???
It’s neither of those above you are claiming it is!
Honestly, a blogger should have known what sourdough is!
Why are you so outraged about a recipe on the internet? It’s right in the post description – Anyways, have a good day and happy holidays xi
I haven’t used the recipe for Instant Pot sourdough bread yet, but intend to. My question is, can I use regular full fat yogurt? We buy Mountain High yogurt.
full fat would be better